Tips and Tricks for Using Software Effectively
by Mel Babb
This column will cover features (some new, some old) often overlooked by both new and long time computer users. We’re hoping you will incorporate at least one of the tips. We’d love to hear from you about what you find helpful. If you have any suggestions about what you would like to see covered, please email Mel Babb at melbabb@earthlink.net. Please, include your phone number so we can call you about it.
Selecting and Renaming a Group of Pictures
Although the following ways to select and do things to files has been around for several editions of Windows, it’s good to remind some of you, and introduce some of you, to these handy ways to manage your files. I’m going to explain how to select and rename files from the My Pictures dialog box. (In case you didn’t know, pictures are files). You can adjust and use these instructions to manipulate files in My Documents, My Computer, or the File Open or File Save As box in most of your software programs.
To open the My Pictures file dialog box, Click Start, Click My Pictures (Or Start, Documents, My Pictures). If you are used to another way to do it, use it.
To select multiple files (pictures), click the first file in the list you want. Shift click the last file (Hold the shift key and click, then release the click and shift).
To deselect one item in the selected list, Ctrl+Click (Hold the ctrl key and click, then release the click and ctrl).
To select items not next to each other, click the first item. Ctrl+Click each additional item.
Once items are selected, Right click on one of the selected items. A menu appears. You can then do any of the things listed on the menu by left clicking the item.

After you download pictures from your camera, they often times have a long number for a name. To rename a group of pictures to something meaningful, start by selecting them. Right click on the first selected item. A menu appears. Click (with left button) on rename. The name of the picture will be highlighted and have some white space around it This shows you the file name is ready to be replaced. To enter a new name, start typing a new name. What’s there will be replaced with what you type.

To edit the existing name, click in the name. The whole name is now white and ready for you to change part of the name. Click or use the arrow keys to position the cursor to where you want to make the change. Delete characters you don’t want, by pressing the Delete key. Press enter when done
If a Rename box pops up saying “If you change a file name extension, the file may become unstable. Are you sure you want to change it?” Click No. Type the name again adding the picture extension, for instance .jpg. The first picture will be whatever you named it; the next, the name (1); the next, the name (2); etc.
Incidentally, you can get into rename mode by clicking twice slowly on the picture name. This happens sometimes by accident when you double click too slow. Clicking anywhere else or pressing the Esc key gets you out of the rename mode.
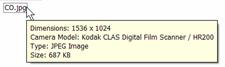
Note: The Rename box “If you change a file name extension,…” only displays if the file names are showing the extension (like .jpg, .gif, .bmp, for pictures; .doc for Word, .xls for Excel—anything after a dot or period at the end of the name). A new computer is set by default NOT to show these extensions. However, people who have used computers for years change a setting so the extension will display. It indicates to the computer system what type of program is needed to use the file. When you rename the file, if the extensions are showing, you must type the extension onto the end of the filename, like CO.jpg. If the extensions are not displayed, you don’t need to type the extension, because Windows keeps whatever file type you had before you renamed the picture. If you point (just point, don’t click) at a picture, you’ll see what type the picture is.
To show or hide the extensions, open My Computer, My Documents or Windows Explorer (whatever you are used to using). Click Tools, Options. Then select the View tab. Check or uncheck “Hide extensions for known file types”.
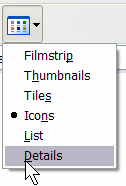
By using the detail view for files (one of my favorites), you can sort the pictures by clicking on the column heading, like name, or date modified. Then switch back to the thumbnails view to see the picture in that order. To change the view, click Views button or from the menu click View and select the view you want.
Now you have pictures named more sensibly. As you review the pictures, you can give more descriptive names to each one.
Hyphens Morph into Dashes in Word
Have you ever noticed when you type two hyphens in Word they become a dash? Let me explain this behavior. Microsoft has programmed Word to act this way. The setting is turned off or on from Tools, AutoCorrect Options, the AutoFormat as you Type tab. It works this way. When on, the auto correct item for converting two dashes to an em or en dash activates after you type another word (or letter) AND PRESS SPACEBAR. Here’s an explanation for those of you not familiar with what em’s and en’s are (no it’s not a cute way to spell the candy M&M’s). Three different length dashes have been commonly used in printed documents for years before computers, the dash -, em—, and en–. The names come from their length. Em is the width of a typesetter's letter "M," whereas en is the width of the letter "N". Dash is used to hyphenate words. Em is used to make a break in a sentence—like this. En is used most commonly to indicate inclusive dates and numbers, e.g., May 10–June 17; pp. 37–59.
In Word for the last few versions the auto correct option turns two dashes -- into em’s or en’s. To get the symbol you want, you need to follow certain rules.
| En Dash |
Em Dash |
| Type a word |
Type a word |
| Press spacebar |
Type -- |
| Type -- |
Type another word |
| Press spacebar |
Press spacebar |
| Type another word |
En dash displays |
| Press spacebar |
Em dash displays |

If you don’t want the dash, Press Ctrl+Z (the handy keystroke for undo) immediately after you press the spacebar. Or Click the Undo button on the toolbar.
File Naming when date is included in name
Use this format: My file name is 2005-08-20 with year before month and day so file names will sort correctly alphabetically. You can omit the hyphen and they’ll still sort correctly. It may be easier for you to read the date with the hyphen though. Since sorting alphabetically starts at the left, if you have numbers it would put them like this 1, 10, 11, 12 , …19, 2, 20, 21. So if you put the year after the month day, the years get out of sequence. If you want to know more about how dates work in names and in Excel, let me know. If I get enough demand, I may do a column on the subject.
Just had to give you some background information on how these particular things work.
Till next time. Happy Computing.
Mel Babb © 2006
Mel Babb, a long time member of HAL-PC, is currently an instructor and on the volunteer help committee at HAL-PC. She runs her own company, PC Tutoring Services. She comes to your home and creates notes for you on what you want to learn. Contact her at 713-981-5641 or email at melbabb@earthlink.net.
|