|
Movie Maker 2.1: Simple and Handy
by Rodger Marion
I like Movie Maker. It does not do the things I can with my professional editing tools, but it has no pretensions and within its limits, is very handy.
Movie Maker 2.1 is part of Windows XP Service Pack 2, which is a free upgrade for Windows XP (Microsoft support site: www.microsoft.com/windowsxp/using/moviemaker/default.mspx). Movie Maker was introduced in Windows ME and a final version, Movie Maker 2.5, is in Windows XP Media Center Edition. A newer version of Move Maker (Version 6) is part of Windows Vista, and comes in two flavors: Movie Maker and Movie Maker HD. The latter flavor is not available in the Windows Vista Home Basic version. You must purchase either the Premium or Ultimate version. Both flavors integrate with Windows Photo Gallery and Windows DVD Maker. DVD Maker is not available in the Home Basic version of Windows Vista. I have not switched to Windows Vista, so this review is about Movie Maker 2.1. A review of Microsoft’s web site indicates that the newer versions are very, very similar to the XP version.
Movie Maker (MM hereafter) has three divisions: Capture Video, Edit Movie, and Finish Movie.
Capture Video
This feature works fine and integrates with the rest of the program. However, I really do not like to use MM to capture clips because it does not separate clips based on time code. It saves everything in one big file and then the program will internally identify all the separate clips by either time code or scene detection.
Edit Movie
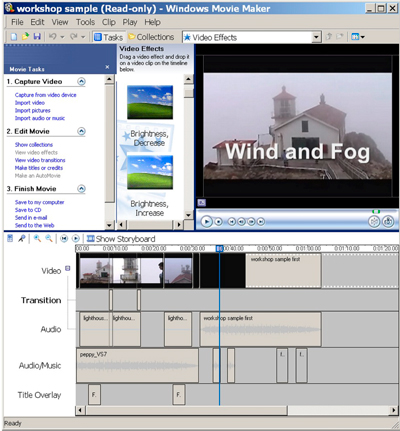
The editing screen is divided into three areas: Bins, Preview Window, and Time Line. MM calls the bins Collections. Because MM likes big files with internally-identified clips, each file is a collection. So, when you import your “captured-elsewhere” clips, each one becomes its own collection. This is awkward, but manageable.
Preview Window. You can see any clip in the preview window. You can scrub through the clip, and cut the clip into smaller clips, but you cannot set in and out points in the preview window. You must drag the clip to the time line to trim it.
TimeLine. The timeline has five tracks: Video, Transition, Audio, Audio/Music, and Title Overlay. When you drag a clip to the timeline, the picture goes in the video track and the sound goes in the audio track. Transitions between scenes, like dissolves (fades in MM), go on the transitions track. Music or narration and titles go on the last two tracks respectively. No tracks can be added. Color correction is done by applying effects, rather than with a tool. It’s crude but works. You can also toggle the timeline to a storyboard, which is sometimes useful. Once, I made a short film that would show 300 still pictures at a rate of one each second. I set the default picture duration to one second and imported all 300 pictures into the storyboard. Then, I arranged the pictures into their final sequence on the storyboard. Finally, I exported the sequence as a DV-AVI file. This file was imported into a more sophisticated editing program to add voice-over narration, music, and credits. I could not have created that five-minute sequence in my “high-end, professional” editing program as easily as I did in MM.
Finish Movie
MM only makes .WMV and .AVI files. Small .WMV files are good for the web and .AVI files in DV format are good to input into a program that makes DVDs. The newer Windows Vista versions integrate with the Windows DVD Maker to produce DVDs. Also, the MM version 2.5 in Windows XP Media Center Edition will make DVDs. That’s about it for the output options in MM.
In summary, MM is a handy program. ‘nuff said.
Rodger Marion, former HAL-PC member and Movie Editing class instructor, lives in Wimberley, Texas and produces movies for entertainment and education. He is also Professor Emeritus at the University of Texas Medical Branch. He teaches graduate courses using the Internet and videoconferencing. Contact him at rodger@smithcreekstudios.com or find out more at rodgermarion.utmb.myefolio.com.
|