Stereolithography- Stop printing pictures!
By Fred Thorlin
Bored with printing out picture books? Don’t you want to create something more tangible? If so you are ready for the next step in printing. Stop printing pictures and start printing things!
Stereolithography is the process of printing solid objects. Several technologies for doing this have been around since the 1980s. The description in Wikipedia is of one of the early systems. Those systems were not only expensive, several hundred thousand dollars, they were dangerous. The photo-setting chemicals were corrosive and noxious. Time and technology have changed the situation a great deal since then. 3D printers now use ABS plastic and are about as dangerous as a laser printer. Most units can create objects in the 10”x10”x10” range and with a resolution better than .01”. Think of this as object-oriented printing. Twenty-four bit color is not available yet, but I haven’t found that to be much of a problem. The generated objects are paintable if color is important to your application.
Getting started creating your object is surprisingly easy and cheap. Any 3D modeling program will work, but normally you need to end up with an STL file to feed to the printer. STL stands for stereolithography. You can get a file converter for your 3D modeler, but it is easier to use a modeling program that produces STL files. The STL format is a text format describing the triangles in 3D that make up your object; three groups of three floating point numbers for each triangle. As you might imagine it takes a lot of triangles to do anything interesting. A real man could produce the files with a spreadsheet program. Fortunately, there are some free trial versions of 3D modeling programs which create the files for you. I use Rhinoceros and SolidWorks. If you are new to 3D modeling, it is a real head-trip getting used to working with three or four images of an object at the same time to get something done.
Typically modelers use a stylus tablet and/or mouse to construct their models. Vast menus give them access to a jillion curves and tools to edit their constructions. I got worried about forgetting some step and having to scrap all of my work, so I opted for a more programmatic approach as my project had a substantial computational component. Rhinoceros provides the option of using a scripting language based on VBA (Visual Basic for Applications) or a plug-in to Visual Studio allowing the use of Visual Basic. I opted for the scripting approach as I felt I could get going with it quicker. The first picture shows what my screen typically looked like as I developed my first project.
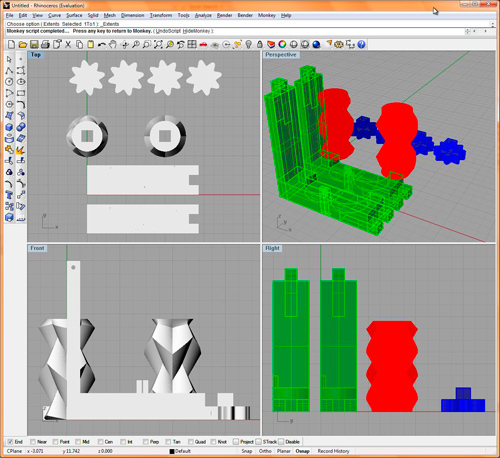
I designed my object and created the STL file with Rhinoceros. I used the trial version which is available as a free download. It restricts how many times you can save an STL file. I then checked generated STL file with the SolidWorks STL viewer to make sure the STL file I produced was indeed compatible with the rest of the STL world. It too is free.
Having created my STL file, I then need a printer to produce it. Prices have come down a great deal, but currently are in the $15,000+ range which exceeds my discretionary printer budget. Fortunately I found Texas Engineering, the Houston representative for StrataSys, the dominant maker of 3D printers. I should note that commercially 3D printers are called “rapid prototyping” devices. Texas Engineering does 3D printing on a service bureau basis. They use the StrataSys Dimension printer line for this, dimensionprinting.com. These units can print with a .007” layer thickness. They will print your STL file; pricing is volatile. You can arrange to email them your STL file and they will give you an exact quote. Additional service providers and pricing schemes are available on the Internet. One is shapeways.com who even supports offering your designs for sale.
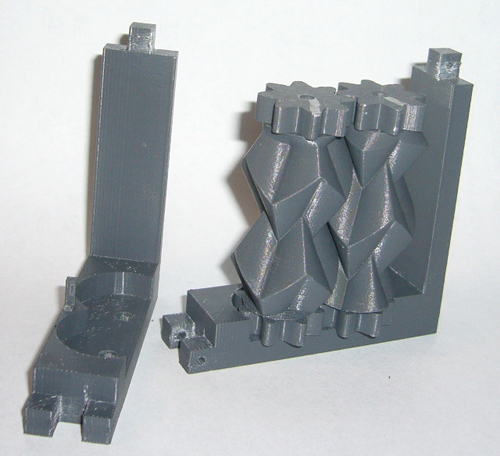
The results were amazing. The first time I had my file printed, it consisted of eight parts, all of the pieces fit together perfectly! Next time I would like to pool my parts with another developer so I could defray the setup fee. The second picture shows the assembled parts I received with a few chalk marks I added.
If you really want to have your own 3D printer, but $15,000+ is a bit steep for you too, you need not give up. For just a few hundred dollars you can make your own. The models won’t be quite as accurate, but you can make them bigger. Instead of ABS plastic the unit I am thinking of uses sugar. If the model doesn’t work, you can probably eat it. For details check out CandyFab on the Internet. If that is too extreme for you, then you should checkout fabathome.org; they offer kits. For the truly far out explorer, consider reprapping (not a typo). This is another group intent on making 3D printers. They too offer kits. What sets them apart is their goal of creating machines that can create themselves. If the thought of machines taking over the world doesn’t frighten you, take a look at reprap.org; they are getting closer than you may want to know about.
This was the first time I had tried to actually accomplish anything using CAD, Computer Aided Design. I found Rhinoceros to be fairly intuitive and the online support to be exceptional. The number of tools available for creating shapes is mind-boggling; this created the closest thing to a problem in that it takes a while to wade through them looking for the one you want.
Real geeks don’t print pictures. They print things!
Fred Thorlin is a cranky old geezer and HAL-PC member who likes playing with the latest toys. You can get a look at some of his other activities at his website, fthorlin.com.
|