Scanners—Better. Cheaper. USB2.
Preface.
- It's been two years since our last review of scanners and what a difference.
Scan quality, speed and software have improved immeasurably. I suggest you
read the "How to buy" article first to provide a bit of guidance in understanding
what you read in the reviews.
- As usual, right after you install your scanner, go to the vendor's web
site and download updated drivers, etc. In addition to the scanner vendor's
software, there are other programs included such as image editing programs.
I'd suggest you also update those at the respective vendor's web site.
- Scanner prices are down, quality and features are up. The scanner reviews
are listed in approximate web/street prices, lowest to highest. Don't use
price alone as your criteria.
- There's a Scanning for Everyone class on April 5th.
Enjoy.
Charles W. Evans, Reviews Editor
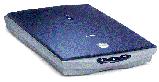 Canon
1250U2F Canon
1250U2F
by Marsha Brown
This scanner should be called the "simply beautiful" model. Not because it
is lightweight.the opposite is true. It is a workhorse, but the options and
features don't get in my way, and there is not a bewildering range of settings.
The "advanced" menu consists of necessary adjustments to get the optimum scan
plus a few other options. Physical beauty won't get good scans - the optics
do! This model's optical scan resolution is 1200x2400. There are higher resolutions
on the market, but even for a small 35mm slide, this is quite sufficient. To
help get the best color fidelity, Canon has upped the color depth race to 48-bits
or 16-bits/color channel. The USB2 connection speeds the scan along its appointed
task.
Simplicity? Instead of the front of the scanner looking like an airline cockpit,
there are only three buttons: scan, e-mail attachment and copy. Using simple
ScanGear Toolbox, which is just a floating box with buttons, you'll find five
additional buttons. The original three are on the scanner itself. Press one
and you are off to completing a preconfigured task. Name them anything you
want. Configure it for "My favorite button" if you want, then leave it up to
Canon. Oh yes, the movable lid allows scan of 3D sources and it is dimensionally
stable (my last scanner was not).
Typically, scans are crisp with good detail and excellent good fidelity.
Remember, this scanner sells for less than $100! The film adapter is excellent,
but will only accept 35mm strips - not mounted. (Canon, you surprised me on
this one.) To scan transparencies and negatives, you slide out a plastic shield
covering the lid's back-lighted area. The template is one of the best and most
sturdy I've seen. The 35mm films are small and need dimensional stability.
Although I use a high-end photo editor, most users will be delighted with the
results of an automated feature that corrects tone, shadow and removes many
imperfections (guys, there's no software that will take your picture and make
you look like Brad Pitt.) This option is integrated and called Quick Automatic
Retouching and Enhancement technology (QARE). And it does work, well. For more
extensive corrections, use Elements.
Tests? The 8x10 color photo scan at 600 dpi took 2:56 minutes resulting in
an 85.1 MB JPG file. The 3x5 color photo at 300 dpi took six seconds resulting
in a 3.9 MB file and at 72 dpi it took less than four seconds to scan a 253
KB JPG file. I didn't use compression or make any adjustments.
The OmniPage Pro OCR program has been around for a long time and using the
supplied OCR test page, I was not impressed. I scanned it three times, but
never got more than about 80% accuracy and it was difficult to ascertain where
the errors were located since the page was visually junky. 'Nuf said.
Canon provides a very nice range of supporting programs that includes their
PhotoRecord and the excellent ArcSoft PhotoBase. I was familiar with them,
so I didn't install any of the programs. They are very good consumer "helper" programs.
Now for the really, really good part: unlike many scanner bundles, you won't
find Adobe's PhotoDeluxe, but you will find Adobe's Photoshop Elements. This
is a junior version of its very big sibling, Photoshop. I use Photoshop so
I can tell you Elements is both very extensive and user friendly. Just take
a bit of time to get to know it.
You'll find the handy Quick Start Guide very useful. This scanner will perform
any task you put to it and do it very well. Two thumbs up! For more info, updated
drivers and software, go to: www.usa.canon.com and click on the "usa" button.
Marsha Brown is a HAL-PC member who is a Managing Geological Technician
and Graphics Illustrator for Pogo Producing Company, which includes creating
illustrations and corporate presentations. She can be contacted at brownm@pogo-hou.pogoproducing.com.
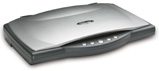 Visioneer
OneTouch 9220 Visioneer
OneTouch 9220
by Larry Dybala
This Visioneer OneTouch scanner looks good. It is small, slim and lightweight,
and is hinged on the side. It scans photographs and documents up to 8.5 x 11.69
inches and has a narrow window-light source on the underside of the top for
scanning slides and negatives. It has a maximum optical resolution of 2400x4800
dpi. I connected the scanner to the USB 2.0 port operating Windows XP Pro.
Five tab-like buttons can be programmed to automatically perform functions
such as scan a color photograph or send e-mail, etc. The scanner comes with
a USB2 cable, a transparency mask, a software CD and three small booklets (Installation
Guide, Getting Started Guide, and Quick Install Card).
Installing the driver and software was undemanding. Both the Scan Manager
Pro (TWAIN) driver and Microsoft WIA driver are installed. The TWAIN driver
is comprehensive and allows you to make every conceivable type of scan adjustment.
It includes a histogram for adjusting brightness and contrast, adjustments
for resolution and sharpness, and controls for gamma, saturation, and color
hue, etc. The TWAIN driver includes an autoscan feature where the item is pre-scanned
to determine the size and then automatically scanned.
The color Magazine cover, which is 7.8 x 10.5 inches, was scanned at 600
dpi. It took 2:37 minutes to scan a JPG file of 17.4 MB. The color 3 x 5-inch
photograph took seven seconds to scan at 70 dpi and was 29 KB; it took 14 seconds
to scan at 300 dpi and was 301 KB in size. The quality of all images was very
good. I sent a grayscale version of the photograph to my e-mail program successfully.
Any resolution over 600 dpi is overkill for scanning photographs and documents.
However, you need a resolution of at least 2400 dpi to scan slides and negatives.
I scanned several negative strips and the process took a long time; each negative
was about 20 MB, but the images produced were very good and clear. The slide
and negative insert holds the transparencies securely in place.
The PaperPort SE scan software is very useful. I've used it before and think
that it is one of the best interfaces. When you scan an item it creates a thumbnail
image in the open folder. You can perform some basic image editing tasks such
as straighten, rotate, and enhance.
When you install PaperPort SE, it automatically configures itself to work
with certain applications that are installed on your computer. To use these
applications, you simply drag the thumbnail over that application's icon. For
example, to fax a document, drag the thumbnail of that document over the fax
application icon. Images are saved in a proprietary format; however, you can
simply save them to other formats such as TIFF, PNG, and JPEG.
The image editing software is ArcSoft PhotoImpression 3. This basic image
editing software has the standard retouching and enhancing tools. It is easy
to use, but offers limited features.
The TextBridge Classic OCR engine is built into the PaperPort software. It
is very basic and has no options for selecting specific parts of a scanned
page. To use it, you simply scan the page and drag the thumbnail of the document
into a text-processing program. It did not perform very well and it ignored
the graphic. I noted numerous errors in recognizing the text - particularly
italic text and numbers.
This Visioneer scanner is a good machine and I recommend it. It is particularly
useful if you want to scan both hard copy and transparencies. The PaperPort
software it comes with is impressive, though the other bundled software has
limited usefulness. For info and driver updates go to www.visioneer.com.
Larry Dybala is a member of HAL-PC and a leader of the Adobe and Windows
Publishing SIG. He is a web developer and technical writer at the University
of Texas School of Public Health as website coordinator and content manager.
He can be reached at lwd@hal-pc.org.
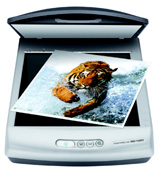 Epson
Perfection
1660 Photo Epson
Perfection
1660 Photo
by Louis Fernandez
So you have a bunch of pictures you had developed at Wal-Mart and you want
to e-mail them to Aunt Sue and you're wondering, "How do I do that?" Well,
here's the answer. The Perfection 1660 scanner is an excellent way to scan
photos to e-mail to Aunt Sue, burn on a CD, or store on your hard drive. If
you want a paperless office, this scanner could scan documents and store them
in digital format to save space. This sturdy, fairly compact scanner has a
solid feel and the top expands to allow for 3D scanning.
The setup went smoothly and instructions in the poster size Start Here guide
are very clear. If you follow the instructions, you can't go wrong, including
the USB2 connection. Although the guide indicates it may take up to 15 minutes
to install, it only took seven minutes.
The TWAIN scanning driver software is the Epson Smart Panel. Large buttons
on the left side of the panel are clearly labeled with icons and brief text
descriptions of their functions. When the mouse arrow is placed over a button,
a more detailed description appears to the right, which makes the options clear
and straightforward to access. Scanner software: Epson TWAIN driver, Epson
Smart Panel and ArcSoft PhotoImpression.
The 3x5 image at 300 dpi was opened in PhotoImpression, the photo editing
software. The software was easy to understand and operate. A menu at the bottom
of the screen makes it simple to select the desired function such as crop/resize,
enhance, effects, etc. When a tab is selected, "child buttons" appear so specific
functions such as image "resize", "rotate" and "invert" features, which were
easy to use, can be accessed. Special effects like "emboss" and "crayon" were
fun to play with and the retouching tools were understandable and effective.
The Help index will answer most of your questions. The software is very user
friendly; however, it may be too basic for experienced users.
Scanner testing. An 8x10 color image at 600 dpi took 1:40 minutes with a
medium compressed JPG file of 9.16 MB. Both color and definition were consistently
good and the software performed flawlessly. A 3x5 color image scanned at 70
dpi took only three seconds and on medium compression, the JPG file was 15.5
KB. When the same image scanned at 300 dpi, it took six seconds and the JPG
file was 341 KB.
OCR capability was tested using a standard test page featuring a mix of graphics,
bold, italic, borders and columns. After being scanned, the page was sent to
Microsoft Word by the OCR software, Presto. It was fairly accurate. However,
it did not pick up the bold fonts aside from one small section of Arial font,
and it could not recognize any of the Italics. It did not pick up the horizontal
rules. Although the scan looked really messy when viewed in Word, it printed
very well, and I was really impressed that it was sufficiently accurate.
This scanner, on the Epson web site, is $149. With all its software, this
scanner is well worth the price. Advanced features include extremely fine resolution
scanning (1600x3200 dpi) and the capability to scan 35mm negatives and transparencies
directly. The film adaptor is excellent, easy to use and produced very good
color fidelity. For more info and driver updates, go to www.epson.com. There
are a number of support options.
Louis Fernandez is a HAL-PC member who will use this scanner to import
paint colors and textures in conjunction with Chief Architect Software and
he can be reached at Louis@lfcompany.com.
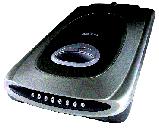 Microtek
5900 Microtek
5900
by Sarah Thompson
This stylish scanner is lightweight and easy to hook up. The USB2 connection
is fast and easy and has no extra hardware to install. I just dropped the CD
in, let it install the software, restarted and I began to scan. Easy? Yes.
The seven option buttons on the scanner: Start, Copy, send photos via e-mail,
Scan, etc. are easy to reach and worked well. The e-mail button scanned my
photo, and then brought up the e-mail message box perfectly. Two "drivers" were
included: a basic driver that will take care of more than 70% of your needs
and Microtek's very versatile and easily understood TWAIN driver. My scan needs
are many and very varied, so I used the TWAIN driver. (TWAIN driver-menus have
advanced selections and a more comprehensive set of options.)
Make sure all your files are updated and you'll have no install problems.
This is a new model with an amazing color depth of 48 bits at 4800x2400 dpi,
which is particularly useful for my 35mm slides/negatives. Great detail. The
built-in 4"x5" transparency adapter also accepts 35mm slides mounted or in
strips. It is OK for 4x5, but flimsy for slides. ScanWizard is your scan menu
and its most important feature is that it does not "hide" options - no hunting
for the adjustment you need. Once you configure the various driver functions,
all options are up front, immediately available and easily navigated. Good
color fidelity in photo scans, less so for mounted transparencies. You couldn't
ask for a more comprehensive range of options/features to make adjustments
to your scan. Excellent driver! Although few of the photo scans were very sharp/crisp,
they were quite acceptable. Microtek scans tend to be "soft". The lid is a
bit loose, which means you'll need to be careful in positioning your document
or it will move out of position. Work on this, Microtek! There's a top side
light to preview a slide.
The 48-bit color gives you 16 bits for each RGB channel. What does this mean?
Your scan has more color depth although it is not visible to most people. But
for small documents and slides, it is very useful. There are advanced adjustments
for color, B&W and halftone correction before scanning. Typically, I only
use them to insure an accurate scan. Editing I perform after the scan.
ABBYY Fine Reader is your OCR program. Using the supplied test page there
was minimal correction needed. Two spaces in the title were missed and most
of the italics. Errors are in green and very easy to correct. You can set it
up to automatically send the document to your word processor! Overall, very
impressive. You could install the Pro version, but it is a demo. The standard
package is sufficient.
Adobe PhotoDeluxe is your digital editor. I didn't test it since I've used
it before. It is an excellent, basic editing program for retouching and enhancing.
PhotoDeluxe allows a fairly wide range of editing from the typical "red eye" removal
to color adjustment of the original scan, crop, size, etc. I use a high-end
program because of the type of work I do.
TESTS: color Magazine cover: 600 dpi, 3:02 minutes, 83.7 MB file; 3x5 color
photo: 72 dpi, 3 seconds, 242 KB file; and 300 dpi, 5 seconds, 4.3 MB file.
Although the higher "dpi" scans were a bit on the slow side, other scan speeds
were impressive.
There's a thin, but adequate, Installation and Getting Started guide. This
5900 merits your serious consideration - I give it two thumbs! For more info
and drivers go to www.microtek.com.
Sarah Thompson is a HAL-PC member who is a free-lance graphic designer
and digital artist.
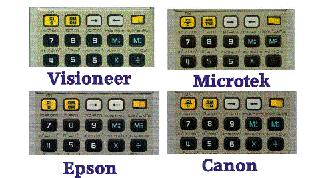
Each close-up, detail scan was made on the same computer system to insure
consistent results. This test is a difficult one for a scanner because the
source was a metal calculator. Metallic "colors" are not easy for a scanner
to discern. Each scan is in color, 600 dpi at 200% to push each unit's capability.
No corrections or adjustments were made. This is a valid test of a scanner's
capability to discern colors and detail, but it is only one test.
In order of best to least color fidelity: Epson, Canon, Microtek and Visioneer.
The last, Visioneer, performed an acceptable scan. In order of best to least
detail: Canon, Epson and a tie between Microtek and Visioneer. Note the differences
in the small text under each button, which were about 1/16th inch from the
scan glass. In most cases you are not likely to see the difference. However,
if you need detail or to enlarge the graphic, for instance to print it, the
difference would be noticeable. Your print would have/not have "snap". Less
capable scanners were not tested for this review.
|