|
|
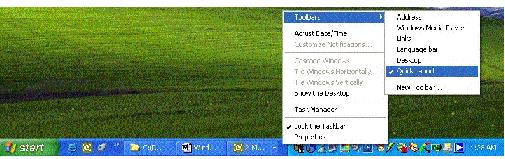
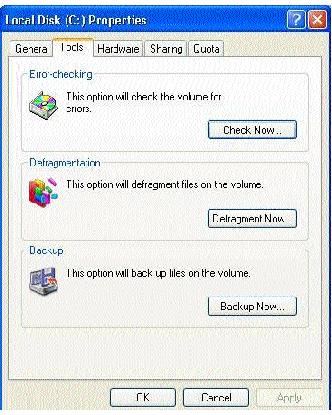
Monthly Questions & Answers For Windows XPAfter a regular shut down, there appeared on the "Start" bar an extra bar of icons at the bottom of the screen just to the right of "Start". Where did this come from and how do I get rid of it? I have tried to close it, delete it, right click then delete it, escape, control alt. delete and it just stays there. It really does not prevent any other use of the computer, but I know it should not remain. Great Question. The icon bar that you see is the Quick Launch Bar. It is a newer feature that Microsoft developed from their Office Toolbar. The Quick Launch Bar is great because it allows you to have shortcuts to start applications accessible without cluttering up your desktop. To remove a specific shortcut from the Quick Launch Bar: "Right mouse click on the specific icon shortcut and choose delete". To add an icon shortcut to the Quick Launch Bar: "Just drag and drop". To hide or display the Quick Launch Bar: "right mouse clicking on an open part of the start bar. Choose toolbars and appropriately check or uncheck Quick Launch". I am sooooooo tired of my "so called" friends sending me virus warnings. They end up not being true and sometimes cause me to delete good working programs. What can I do? First consider finding new friends. It sounds like they are the virus. These types of warnings are ridiculous. Have a current antivirus program installed on your PC and stop worrying. HALNet has a great antivirus service as well. If you do want to follow up on rumors that you might hear, try going to: www.norton.com or www.mcafee.com. and review the current or new threats. Also, a real fun site to go to is the Urban Legend site. It has a search engine which helps make it easy to find some of these issues. The Urban Legend Site can be found at: www.snopes.com/. What happened to Scandisk? I can't find it anywhere. I don't imagine that Disk Cleanup and Disk Defragmenter have replaced it, have they? No, Scandisk is still here. It has however been renamed to "Error Checking". Microsoft has to rename programs or move them with each release to make it a little more challenging for the end user. Go into (double click) "My Computer". Right mouse click on the "C:" drive and choose "properties". Choose the "tools" tab and click on the "Error Checking" button. Thanks for the super question! My Windows XP Operating System was pre-installed on my PC using FAT. I heard that I should have something called NTFS used for Windows XP? Can I install NTFS? When I asked the technician, I was told that I would have to erase everything on my hard drive, install NTFS, and then reinstall all of my programs. Is NTFS that important? Yes, you can install NTFS: New Technology File System, and No, you do not have to erase your hard drive. Windows XP supports three file systems for fixed disks: FAT16, FAT32, and NTFS. Microsoft recommended that you use NTFS with Windows XP because of its advanced performance, security, and reliability features. This article describes how to convert a FAT16 or FAT32 volume to NTFS. Be aware, however, it is more difficult to troublehoot and recover lost files with NTFS due to the improved security. You can use the convert command (Convert.exe) to convert an existing FAT or FAT32 volume to NTFS. Because this conversion retains all of your files (unlike a format operation), use Convert.exe when you want to keep existing files on your volumes intact. Before you convert a drive or partition to NTFS, consider the following:
To convert an existing FAT or FAT32 volume to NTFS, follow these steps:
Terrific Question! Sorry for the long and detailed answer. I hope that it helps. For more information, please go to Windows XP "Help And Support" option. If I do a back up of my registry, as discussed in a previous article, and then my registry gets corrupted so that the system does not boot, what do I do? If you are a religious person, you can start praying. I do not like directing people to adjust or replace the registry because it is too easy to crash a PC. If your PC has already crashed, it is best to get physical help before starting the surgery. Please do not accept the information below as "THE WAY," but instead review as much information before dealing with a "Crashed" PC. Check for viruses before assuming that your registry is corrupt. Before restoring the registry, reboot the PC while pressing the "F8" button. This will bring up a special boot menu. Choose the option "Last Known Good Configuration" and reboot. See if using this last "Restore Point" fixes your problem. If you have a current emergency repair disk, you can boot off your Windows XP CD and choose the repair option. If you have to manually restore your back-up copy of your Registry, you can try Microsoft's directions as shown below. Whatever the outcome, a corrupt registry (next to fire) is about the worse thing that can happen to a PC. The Registry consists of five registry hives. Make sure to replace all 5 of the registry hives. If you only replace a single hive or two, this can cause potential issues, since software and hardware may have settings in multiple locations in the registry. Part One In part one, you boot to the Recovery Console, create a temporary folder, back up the existing registry files to a new location, delete the registry files at their existing location, and then copy the registry files from the repair folder to the System32\Config folder. When you are finished with this procedure, a registry is created that you can use to boot back into Windows XP. This registry was created and saved during the initial setup of Windows XP, so any changes and settings that took place after Setup completes are lost. To complete part one, follow these steps:
Box 1
This process will backup the current Registry and then delete it. "md tmp"
NOTE: This procedure assumes that Windows XP is installed to the C:\Windows folder. Make sure to change C:\Windows to the appropriate windows folder if it is a different location. Part Two In part two, you copy the registry files from the backed up location by using System Restore. This folder is not available in Recovery Console and is normally not visible during normal usage. Before you start this procedure, you must change several settings to make the folder visible. To complete the procedure described in this section, you must be logged on as an administrator, or an administrative user and start the PC in Safe Mode.
These files are the backed up registry files from System Restore. Because you used the registry file created by Setup, this registry does not know that these restore points exist and are available. A new folder is created with a new GUID under System Volume Information and a restore point is created that includes a copy of the registry files that were copied during part one. This is why it is important not to use the most current folder, especially if the time stamp on the folder is the same as the current time. The current system configuration is not aware of the previous restore points. You need a previous copy of the registry from a previous restore point to make the previous restore points available again. The registry files that were copied to the Tmp folder in the C:\Windows folder are moved to ensure the files are available under Recovery Console. You need to use these files to replace the registry files currently in the C:\Windows\System32\Config folder. Recovery Console has limited folder access and cannot copy files from the System Volume folder by default. Part Three In part three, you delete the existing registry files, and then copy the System Restore Registry files to the C:\Windows\System32\Config folder:
"del c:\windows\system32\config\sam"
|
2003 If you have any Windows XP questions that you would like to see in this column, please email them to utmr@hal-pc.org. The top 5 most requested questions will appear in the Magazine each month along with new helpful Windows XP websites. Todd Rosen is a HAL-PC Windows & Internet Instructor, Microsoft Partner & Tester, SBC Network & PC Management, and SSM.
|