Tips and Tricks for Using Software Effectively
by Mel Babb
What about Files and folders?
After you’ve had a computer awhile (a month or several years), you finally wonder about all the stuff in a file dialog box. For the next 2 or 3 articles I’ll attempt to explain what files and folders are all about and how you can use the various file dialog boxes to manage the files on your computer. Take a look at the figures of the Save As box in Word and the My Documents file dialog box.
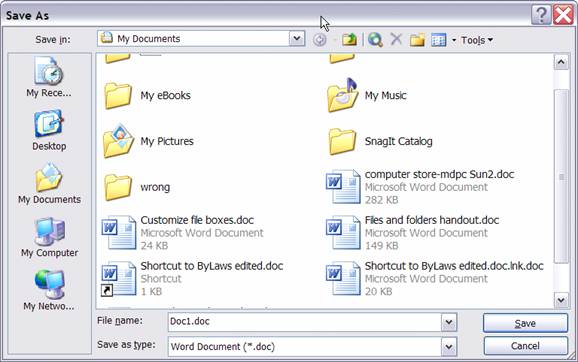
Figure 1: Save As File Dialog Box
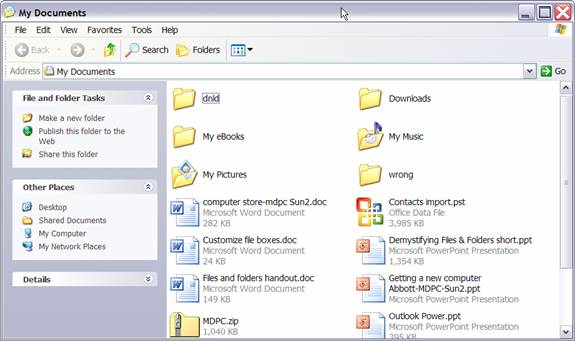
Figure 2: My Documents File Dialog Box
Notice that much of the information is similar (like names of folders and files), because all the dialog file windows access the same files and folders. Also, notice that the Save As box for Word shows only the Word files while the My Documents box shows all the files. Each file box has different “window dressing” to make it easier to manipulate the files from the location you are at. Additionally each window can be modified as you prefer for even more ease of use. Some confusion is natural until you know how to manage the flexibility of the file dialog boxes. Before I elaborate on how to do that, let me give you some conceptual information.
As a starting point think of files divided into two large groups. The files that operators (like you) create and use, and those the computer deals with and needs. First, let me clarify. What’s called a “computer” is more accurately a computer system, composed of many components. An operator (like you) uses the monitor, keyboard, mouse, and printer, while behind the scenes things like the CPU, RAM, hard drive, and files work to make things happen. They provide the “engine” for the system. Very simply, the files the computer requires contain the instructions so the system will “do stuff”. Those are all the files, tucked away in folders that were already on your computer when you got it. The Windows group of folders has files with the operating system, which provides the foundation for running everything and coordinates the use of all the parts, CPU, drives, printer, etc. Other groups of folders contain program (software) files. Hundreds of megabytes of space are required to store these. Without them the computer won’t work.
Now let’s look at what you see on the screen in a file dialog box. First folders. Most attempts to describe folders, relate them to file folders used in file cabinets. Thus a yellow icon that looks like a file folder is used. But, this analogy breaks down, because computer folders can be nested one into another which is more like an outline. So I like to think of folders as labels or categories in an outline so that related files can be grouped together. For the thousands of files needed to run a computer, folders provide a way for humans (yes programmers are human) to be able to keep them organized. Most of the time you do not need to concern yourself with the folders and files that came on your computer. The folders and files that are important to you as a user are the ones you create, receive from others, and work with. That’s what this series of articles will concentrate on.
The kinds of files you use fall broadly into these types: Files you create or receive from others or from the internet; picture and image files; video and music; email; address book (contacts); favorites or bookmarks; backup; html for internet web pages; and PDF (portable document format) files for Adobe Reader. Each type has special characteristics which we’ll elaborate on in later articles. Now we’ll concentrate on what and how the file box displays things. Many ways are available to view thumbnails (small pictures) or lists of your files, all of which reside randomly on your hard drive, or in other “storage media” like a CD, DVD, flash (alias jump, thumb, or USB drive), or a memory card from a digital camera.
Let’s look briefly at storage media. All files need to be stored in some kind of permanent place. Disks are the hardware used for file storage. On the screen they are represented with an icon, a name, and a letter. Back in the DOS days (with no graphics) they were designated with letters, A: was the floppy (fast becoming obsolete), B: was a second floppy, C: the hard drive. All other letters were used for whatever other storage equipment was on the system. Today a system usually contains one or two CD and/or DVD drives. Also other devices can be plugged into the USB port when needed and are shown, when plugged in, as drives like a flash drive or a memory card. If the computer is attached to a network, other drives can display when the network is accessed.
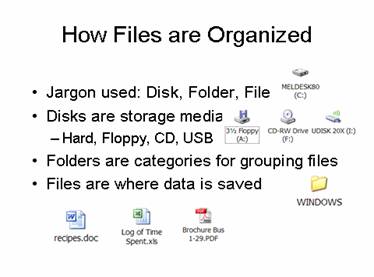
Figure 3: How Files are Organized
Back to the file dialog box. Windows uses certain conventions to represent what’s in the drives. See the “How files are organized” figure for a summary. In addition, Windows supplies some default folders for you to store data in that you create or want to save (for instance, when others send files or pictures to you in an email). These folders are My Documents, My Pictures, My Music, My eBooks. Microsoft has coordinated its programs so whenever you click Save or Save As the first time, one of these folders opens depending on the kind of file it is.
Saving a picture or file from an email
If using HAL-PC web mail, Outlook or Outlook Express, right click the attachment and choose Save As (or save picture or target as). If using, Yahoo, or sbcglobal click save (or save target as) and/or download button. Then you’ll encounter a “Save As” file dialog box. The quickest thing to do is just click Save. But wait where did the file go, what’s it named and how do you find it? The answer is: it depends. Before you click save, notice what the “Save in” folder is at the top and the file name is at the bottom of the box. To see the file again, click Start, and My Documents (Or My Pictures). Change the folder, if you need to, and double click on the file.
Here’s other things to be aware of. The view on the file box that opens depends on how it was left the last time you used it. (Like stuff lying around in your home when you’re not expecting any company). Most likely it will open in My Documents, My Pictures or Desktop. The “Save in:” blank at the top indicates the folder to store the file in (here it’s My Documents). Refer to Save As figure 1, shown before. To change the location either 1) Double click a folder in the contents list (which is the space below the “Save in”), or 2) click the drop down arrow at the end of the “Save in” blank and click on a folder, or 3) click the “Up one level” icon (one with the green arrow) to move up to the next higher level in the folder outline (in this case the Desktop), or 4) click one of the icons listed in the left panel of the box. At the bottom of the box, note the name of the file. Change it if you like.
The “Save as type” blank at the bottom of the box determines what program(s) must be utilized with that file. Each file has certain instructions coded in it that will only work with certain programs. More will be explained about type of file in another article. If the file is a picture downloaded from a camera, it will encode the model of the camera and in some cases the date the picture was taken as well as the dimensions in pixels and size in kilobytes. (You will probably have to Google the model number to find out which camera it is). After the file is saved, point to the file name in the file box to see this information. A yellow tool tip pops up no matter which view you have selected, thumbnails like the figure here or lists, or details, etc.
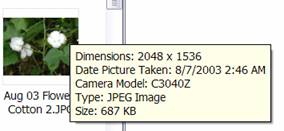
Figure 4: Tool Tip displays when file pointed at
Views let you see the files in a variety of formats so you can more easily manage your data. You can change views from the menu, by clicking View, Filmstrip, etc. or click the drop down arrow on the views button, the last one in the window. The default view is Tiles in My Documents and Thumbnails in My Pictures.
I like the details view because I can rearrange the list in various ways. Here are some ideas. Change the size of the box by pointing at an edge or corner until a two-headed black arrow appears and drag the border out or in. Double click on the title bar at the top of the box to maximize it. To return it to the previous size, double click the title bar again. Click on any column heading to change the sort order. One click on date modified sorts by first to last date. Another click sorts last to first date. This is one of my favorite sorts, because I can remember about when I created a file but not what I named it. Move a column around by dragging it to another location. Resize a column to fit the widest entry by double clicking on the border (line) between columns. Hide or add a column by right clicking on a column and clicking what you want. Click on the Folders icon on the toolbar of My Documents and presto, you have a list of folders in the left pane instead of the task list. This makes the box look like Windows Explorer. Click folders icon again and the task list returns.
Here’s a few more things about how the file dialog boxes work. My Documents and others opened from the Start menu have a back and forward button like a browser window. The Save As box has only a back button. For those on company networks or even a home network, both have on Tools a Map network drive feature that let’s you assign a letter to a network folder making it easier to access it. It creates a listing in the folder My Computer with the drive letter you assigned. Note that the first letter suggested to use is Z. This is because Windows not only uses the letters at the beginning of the alphabet, but also shifts them around depending on how many drives are added. So to keep from messing with “Mother Windows” use letters at the back of the alphabet.
Both dialog boxes have a short cut menu available when a folder or file is right clicked. Frequently used folders can be added to the Look In bar on the left side of the Save As box. Select the folder to add and click Tools, Add to “My Places”. If you put many folders on the Look in bar, by right clicking there you can rearrange the icons and also make then smaller.
Until next time, customize a My Documents dialog box the way you want it. Then, click tools, Folder Options. Click the view tab and click “Apply to All folders”. All the folders will open this way except when you open a program and access the Open or Save As box from there. Then the view will default to whatever that program dictates. More will be revealed next time.
Mel Babb, a long time member of HAL-PC, is currently an instructor and on the volunteer help committee at HAL-PC. She runs her own company, PC Tutoring Services. www.melpchelp.com She comes to your office or home and creates notes for you on what you want to learn. Contact her at 713-981-5641 or email at mel@melpchelp.com
|