|
|
Use PowerPoint Tools in Slide Shows
|
 |
To add a design to a presentation
A design is a coordinated background with font colors and sizes
For on screen use dark background, light type color
Click slides tab or outline tab in left pane for ease of review
If left task pane disappears, Click View, Task Pane (Ctrl+F1)
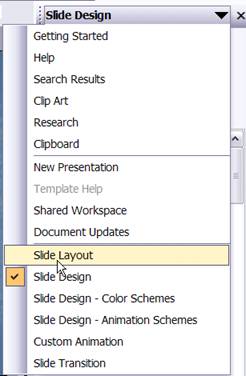
Click Design on the toolbar (near right end of toolbar)
Or in the right task pane, Click the down arrow and choose “Slide Design” (or click Design icon on toolbar
Scroll to design you want and click it
Only the title slide shows on the task pane
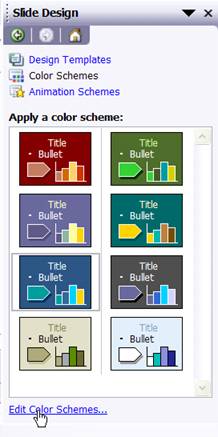
Pick and change Design
Click Design icon on toolbar
Drag the scroll bar to see all designs
As you point at a design, the name of the design appears in a tool tip
When you find one you want to use. Click the design
Try several until you find the one you like
To change colors on the design
Click Design icon on toolbar
Click Color Schemes,
Pick the color scheme you want
Pick a new color for background, and text, etc.
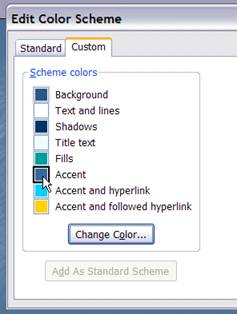
To change color of a design once it is selected
At the bottom of the task pane, click “Edit Color Schemes”
Click one of the colors for an element (like Accent)
Click Change color
Click custom tab and note the original color numbers so you can set it back if you want
Click Standard tab
|
Select a color, which shows compared to current on in lower right Click OK
|
To change background on a slide to just white
Choose Format, Background (or right-click, near any edge of slide. Click Background)
Click drop down arrow next to color block
Choose white
(If no white there, choose more colors and select the middle dot, which is white)
Check “Omit background graphics from master”
Experiment with fill effects for background
Choose Format, Background (or right-click, Background)
Click drop down arrow next to color block
Click Fill Effects. Try something under each tab
Lots of possibilities
To Undo
Click the undo icon or Press Ctrl+Z
To undo several steps click down arrow next to undo icon
To move info or slides around
Be in Normal View. Click View, Normal
Click Outline tab at top of left task pane
Click on icon or bullet you want to move
Drag info or slide to new location
A black horizontal line shows where it will go.
|
Creating Text
Click on a placeholder
(The dotted line shows borders of box you type in.
You don’t type directly on slide you put a box called an object on it first.)
Type text. Click on next placeholder or press Ctrl+Enter
To indent on a slide, Press Tab
To come back to the margin, or Outdent, Press Shift Tab
Add a Slide
Click New Slide on toolbar or Press Ctrl+M
A title with bulleted list slide is inserted by default.
Select a different layout if you want from task pane
Insert clip art
Click the Insert clip art icon (the head on the bottom toolbar)
Or click one of the layouts that has the clip art icon and text on it
Pick a category, find the clip you want and insert it
Insert a picture
Click Insert on the menu, Picture, From file
Find the picture you want, insert it
Adjust a picture or clip art
Click on picture or object to select it
To move see a 4 headed arrow and drag
To resize, see a 2 headed arrow in a corner and drag.
If you drag from a side, you will distort the picture
To make all 4 sides out or in, hold Ctrl while dragging
|
Use undo and try again
To manipulate a picture
To move picture in all 4 directions, Hold Ctrl and drag a corner
To rotate the picture, Drag the green dot.
To crop click the crop tool and drag out the part you don’t want
Click off the picture to exit the crop tool
When you click off the picture the toolbar disappears
When you click back on the picture the toolbar reappears
Change color of object
Right-Click the object, A menu appears
Click Format object (at bottom of menu)
Click the drop-down arrow next to color
Choose “No fill” at the top to have the object clear
Or Pick a color you want
Click ok
Notice other things you can change about the object
Like line width and style.
To make items on screen bigger Zoom size of screen
Click the drop down arrow next to the Zoom button
Click the size you want or type in a size (for instance 137)
|
Save often
Click the Save icon
Drawing Tools
On drawing toolbar on bottom click shape you want
Drag the shape on the screen
To change the shape, click draw, change auto shape
To make multiples of same shape
Draw a shape
Press Ctrl+D to duplicate
Position the second shape where you want it in relation to the first
Press Ctrl+D multiple times to create more shapes
Group the shapes
Lassoo the shapes to select them
Click Draw, Group
Now the pieces will move as one object.
To Draw objects (like triangle and circle, etc.) on slide
At bottom of screen, click AutoShapes, Basic Shapes
Click the triangle. The cursor turns into a crosshair
Starting at the upper left on the slide,
Click and drag diagonally to the lower right and release
A triangle appears as you drag.
To keep a circle perfectly round or draw an equilateral triangle, hold Shift while you drag
To change properties (like color) of the object
Right click when you see a 4-headed arrow and choose Format AutoShape (near bottom of menu)
Line Up Objects
Select objects
Click Draw, Align or Distribute
Pick alignment you want
Put same info or logo on every slide
Like company name, date of presentation, slide number
For text info on every slide use View, Header and Footer
For logo and other design elements, use View, Master
To set up slide show transition
Transition is the way the slide appears like fly in, box, cover
Click down arrow in task pane
Click slides you want to affect
Click View Slide Sorter to see all slides
Ctrl+A selects all
Choose Slide transition
Pick a transition
Set speed, sound, auto timings, if want
Click Apply
Click Pay or Slide Show to preview
Make each bullet item appear when mouse clicked
Apply Animation Scheme
Choose Slide Sorter View (View, Slide Sorter)
Click on slides you want
Click Slide Show menu, Animation Schemes.
In the task pane click an animation scheme in the list.
Click Pay or Slide Show to preview
To make more complex movement use custom animation. Look up animate in help.
Run the PowerPoint show
Run From beginning Click Slide Show, View Show (Press F5)
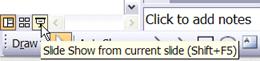
Run From current slide Click Slide Show icon at bottom right of screen (Press Shift+F5)
To see how to control the show while the show is running, Press F1
|
A box appears with commands for going to previous slide, blanking the slides, etc.
To stop the show Press Esc
Print a show for handouts
Print the show in black and white without the background.
Have more than one slide on a sheet of paper.
Click File, Print
Change “Print what” to Handouts
Change “How many per page” from 6 to 3
Check Grayscale or pure black and white
Go forth and make professional slide shows! Till next time. Happy Computing.
Mel Babb © 2007
Mel Babb, a member of HAL-PC since 1985, is currently an instructor and on the Volunteer Help committee at HAL-PC. She runs her own company, PC Tutoring Services. She comes to your home and creates notes for you on what you want to learn. See her website www.melpchelp.com or contact her at mel@melpchelp.com

2008
November/December
2007
November/December
October
September
May
March
January
2006
Nov/Dec
October
July
June
May
April
March
February
Mel Babb, a long time member of Hal-PC, is currently an instructor and on the volunteer help committee at Hal-PC. She runs her own company, PC Tutoring Services. She comes to your home and creates notes for you on what you want to learn. She can be reached at melbabb@earthlink.net