The Latest Trumors, Beverly Rosenbaum
The Twain Has Just Met
(despite Rudyard Kipling’s belief that two such disparate entities never could)
The unlikely union of Microsoft Windows and Apple OS X is a reality, thanks to new Intel-based hardware.
Soon after Apple introduced their new MacBook Pro and iMac models in January of this year, that vision became reality. By March a pair of hackers had succeeded in creating a dual-boot option they called XP on Mac (XOM), and claimed a prize of more than $13,000. In early April Apple released a beta version of Boot Camp, their own dual-boot utility that will be included in the next major release of OS X (Leopard) in 2007. Within days of that announcement, Parallels, Inc. introduced a beta of its virtualization software that allows users to run Windows alongside Mac OS X without rebooting.
The necessary tools to try any of those three methods are available from a single web site at download.onmac.net/.
For XOM, users had to reformat and manually repartition their Intel Mac’s hard disk drive to create a separate partition where Windows XP could be installed, and then go through a multi-step process to make sure the software is installed properly so the Mac can recognize it. It’s described in detail at www.pcworld.com/downloads/file_description/0,fid,62779,00.asp#.
In contrast to the difficult and time-consuming installation of XOM, Apple’s Boot Camp and Parallel’s Workstation 2.1 Beta6 are both surprisingly easy. I spent a great deal of time reading as much as I could about all these options before trying any of them and gathered up everything I thought I’d need beforehand. In fact, it took longer to read about the installation process than to actually complete the steps. The most time-consuming part was the time required by Windows XP for installation.
User experiences are posted on many web sites, including www.macwindows.com/winintelmac.html, and www.macuser.com/xp-on-mac/everything_you_wanted_to_know.php, and one of many helpful forums is discussions.apple.com/forum.jspa?forumID=1165.
Boot Camp
I decided to start my testing with the Apple-released Boot Camp, a non-destructive tool that prepares your drive for dual-booting Windows by creating a second partition without affecting any Mac files. www.apple.com/macosx/bootcamp/publicbeta.html. To use Boot Camp, you’ll need to have the following:
- An Intel-based Mac with a built-in or USB keyboard and a built-in trackpad or USB mouse
[Apple currently has three MacBook Pro models, two iMac models, and two Mac Mini models with Intel CPUs, and wireless input devices are not supported.]
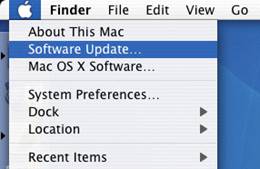
- The latest OS X Tiger v10.4.6
[If you have Mac OS 10.3 or later you can use the Apple Software Update Tool, see instructions at docs.info.apple.com/article.html?artnum=106704]
- The latest firmware update (search for your hardware model at www.apple.com/support/downloads/)
[The most recent update was posted on April 5, specifically to support Boot Camp]
- At least 10 GB free hard disk space on a single-partition start-up disk
- A blank recordable CD for drivers that Windows will need for Mac-specific hardware
[these include graphics, networking, audio, Airport wireless, Bluetooth, eject key, brightness control, and a Startup Disk Control Panel for Windows]
- A printer for the instructions provided in the Boot Camp Installation and Setup Guide, which you can download from images.apple.com/macosx/bootcamp/pdf/Boot_Camp_Beta_Setup_Guide.pdf
- A legal copy of “full-install” Windows XP Service Pack 2, Home or Professional, on a single CD with a valid product key, not an upgrade version
[you can create the disk yourself by slipstreaming if you don’t have one, see instructions at www.winsupersite.com/showcase/windowsxp_sp2_slipstream.asp]
You must use a single CD because there’s no way to eject one Windows disk to insert another until after the Windows installation is complete. If you have a CD stuck in the drive, you’ll have to restart the computer and hold down the mouse button to eject it.
If, for any reason, you decide to restore your Mac to its previous state after the firmware update, you can create a Firmware Restoration CD by following the directions at docs.info.apple.com/article.html?artnum=303469.
The Boot Camp Assistant walks you through the steps to create a CD with XP drivers for the Mac hardware, partition the disk, and then install XP. Don’t skip the step to create a drivers CD or you will have to go back and do it later, because it provides drivers for many devices that are not recognized by XP Setup.
During installation, the Windows XP installer will ask whether to format the Windows partition using NTFS or FAT. If the partition is 32 GB or smaller, you can use either one. If it's larger than 32 GB, you can only format it using NTFS. Mac OS X can read and write FAT volumes, but the NTFS volumes are read-only, so I chose a 30 GB FAT32 volume.
While installing Windows XP, you’ll see a list of several partitions for the hard disk. You should install Windows XP on Partition C only. You should not create or delete any partitions during that step, or select any partition other than partition C, or you may delete the contents of your Mac OS X startup volume.
After installing Windows XP, by default the MacBook Pro boots to the Windows partition. This can be changed in the Startup Disk utility installed by Boot Camp into the Control Panel. Go to Control Panel > Performance > Startup Disk and select the default boot partition. If you happen to have a bootable CD/DVD in the drive you can even choose to boot from that.
Or you can choose the startup disk from the Mac OS X System Preferences > Startup Disk pane. While the control panel or preference pane options will permanently change the system's default behavior, you can temporarily boot to a different partition by holding down the option key until you hear the Mac’s “bong” sound during boot up.

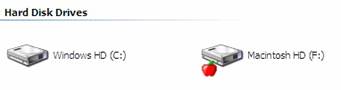
You’ll get a graphical boot menu showing two hard disk images (as well as any bootable CDs), with the words “Macintosh HD” on one and “Windows” on the other. The arrow pointing up at the current selection can be moved from choice to choice using the arrow keys on the keyboard. Press Enter to make a selection. This menu only appears when you hold down the Option key at boot up; otherwise the Mac will boot into whatever OS you chose the last time. Any problems that occur in the Windows partition do not affect the Mac partition.
From the Mac side, your Windows partition will show up on the Mac desktop as a hard drive called “Untitled.” I renamed mine to “Windows XP.” You can navigate this disk using the Finder just as you would any other hard drive that’s attached to your Mac, even if you formatted the partition with NTFS during XP Setup (making it read-only). If you formatted it as FAT32, you can read or write files there.
From the XP side, the Windows-formatted partition appears as the C: drive, but you can't see the Mac-formatted partition. However, a third party tool called MacDrive, $49.95 from Mediafour (www.mediafour.com/), lets you access Mac-formatted disks from within Windows. With MacDrive installed, the Mac partition appears as another drive under Windows XP and has a little Apple logo next to it to indicate it’s a Mac drive. This allows you to seamlessly read and write files on the computer’s OS X boot partition, and other Mac disks, including external USB and FireWire drives. MacDrive also burns Mac CDs and DVDs.
Mac Software Issues
All Mac applications must be rewritten to support the Intel processors. The Universal versions of these programs can run natively on both a PowerPC Mac and a new Intel Mac. OS X will attempt to launch older programs in a PowerPC-emulation environment called Rosetta, where programs unfortunately run slower than on a comparable PowerPC Mac. There’s no fix for this at the moment except an application update. The Classic environment no longer exists at all on Intel-based Macs.

You can check out the status of third-party applications for the new Intel-based Macs at www.macworld.com/topics/software/universal/index.php.
Some PowerPC programs have features that don’t work or the programs won’t launch at all on Intel Macs. Among them are Microsoft’s Virtual PC, and disk-repair programs Alsoft’s DiskWarrior and Micromat’s TechTool Pro. Never attempt to use a non-updated disk-repair program on an Intel Mac!
Some plug-ins that haven’t been updated also don’t work in the Safari Web browser, even though Safari is running as a Universal program. If you can’t get an updated version of the plug-in you’re having trouble with, you can try this workaround:
Quit Safari and open its Get Info window in the Finder (click on the application icon and press Command-I). Choose the Open Using Rosetta option. The next time you launch Safari, it will open using Rosetta. You’ll lose the Intel speed advantage, but at least the plug-in will work.
Software for XP on Mac
You’ll definitely need to get any Microsoft updates and patches, as well as an anti-virus program for your Windows XP installation. AVG Anti-Virus (free.grisoft.com/) is one of three free anti-virus tools listed at www.macworld.com/2006/04/firstlooks/pcantivirus/index.php. Another good choice is the collection of free programs from Google, which includes a special version of Norton Anti-Virus with six months of free virus updates. Ad-Aware SE Personal, a free spyware/adware removal tool, is also part of the Google Pack available from pack.google.com/. You can personalize the download to remove or add other applets such as Google Earth browser, Google Desktop companion, Picasa photo organizer, Google Toolbar for Internet Explorer, Google Screensaver, Google Talk, Google Video Player, Mozilla Firefox, Adobe Reader, Realplayer and GalleryPlayer HD images.
Boot Camp Issues
The biggest problem is that there’s no right mouse button. In OS X you can get around that by holding down the ctrl key and clicking, but in Windows XP ctrl + click does nothing. Installing a freeware Apple Mouse Utility from RH Designs (www.geocities.com/matroxfiles) will correct the problem. Then you’ll be able to hold the ctrl key down to make ctrl + click work as a right click under Windows. Make sure the utility loads at startup. The other option to right click is a little more awkward, to hit Shift + F10. You can also use a two-button USB mouse.
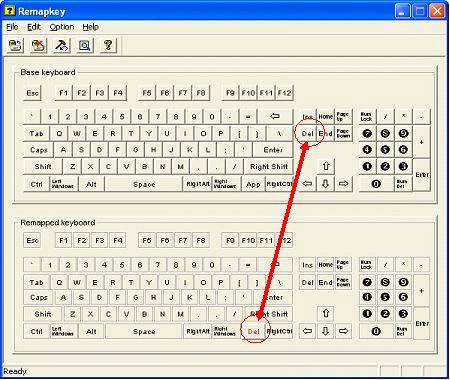
Control-Alt-Delete is really only an issue for the MacBook Pro, as it lacks a true Delete Key. OnMac (www.onmac.net) recommends using a utility from the Windows Server 2003 Resource Kit to solve that problem. Download rktools.exe from www.microsoft.com/downloads/details.aspx?FamilyID=9d467a69-57ff-4ae7-96ee-b18c4790cffd&displaylang=en and install it. Go to Start > Run and enter remapkey to remap keys on your keyboard. OnMac suggests using the Right Command key on MacBook Pro keyboards for delete. To do this, click the delete key on the top keyboard of the utility and drop it on the right command key on the lower keyboard, save and reboot, and then you’ll be able to use Control-Alt-Right Command to act as your Control-Alt-Delete.
Apple’s driver CD installs a driver to enable support for the eject key on the MacBook Pro keyboard, which is very helpful because without it or any support for a right click, getting a CD or DVD to eject is a lot of trouble. There’s also no support for the function hotkeys or page up, page down, home and end keys.
The integrated iSight camera is not supported under Windows XP, even though a camera icon does show up in My Computer. If you make the mistake of doubling clicking it, you’ll get a blue screen.
There are no drivers for MacBook Pro’s ambient light sensor, hard drive sudden motion sensor, Apple Remote Control Apple’s optional USB Modem, MacBook Pro’s keyboard backlighting, or Apple’s wireless keyboard and mouse add-ons. And not all keys are supported on Apple Bluetooth keyboards. In addition, there’s no Apple driver for the MacBook Pro’s built-in TrackPad, and as a result, Windows uses a generic Microsoft touchpad driver. The system time clock is also problematic, because Windows and Mac computers handle system time differently. Theoretically, Windows should be able to correct the problem automatically by connecting to a time server to get the correct local time. But because Windows XP does this on a once-a-week basis, with no user-controlled option for changing it, the only apparent option Boot Camp users have is to open Windows’ Date and Time Control Panel, click the Internet Time tab, and click the Update Now button. Or just manually change the time. Microsoft offers an article in its Knowledgebase that explains how to make a change in the Registry to force Windows XP to check an Internet time source more frequently than once a week.
Dual Boot vs Virtual Machine
Boot Camp provides a true dual-boot (not a multi-boot) solution, with only one operating system running at a time. So Boot Camp is only convenient for those who are going to occasionally be switching between the two OSes. Anyone who switches back and forth more frequently may want a different solution that would allow them to run Windows XP and Mac OS X side-by-side, at the same time. The simplest such solution is a virtual machine.
Virtual PC and other PC emulators were created for Mac users who needed to run Windows. Those emulators generally worked in a window inside OS X and enabled the users to do things like copy text between the two OSes. But most importantly, they could run and use Windows applications without ever logging out of OS X. These virtual machines typically ran much more slowly than the underlying hardware, because they’re software-based and run as applications under the host system. Performance under emulators like Virtual PC was very slow, making them frustrating to use. However, the Core Duo used in Intel-based Macs supports Intel’s Virtualization Technology (VT), increasing performance and making the job of a virtual machine easier. Microsoft has not yet updated Virtual PC to run on Intel-based Macs.
Parallels, Inc. released the first hardware accelerated virtualization software for OS X supporting Intel’s VT. So in theory Windows XP runs alongside OS X with practically the same performance as in Boot Camp. The VM’s hard drive is treated as a single file in OS X so you don’t need to create any partitions. The new Workstation 2.1 Beta6 for Mac OS X allows users to run Windows, Linux, OS/2 or any other operating system alongside Mac OS X (without rebooting) on Intel-based Macs. You can get a 15 MB download of a free trial from www.parallels.com/en/download/mac/, install it with a single click, and follow an installation wizard to build and configure a virtual machine.
All of the things that didn’t work on the keyboard in Boot Camp worked just fine in this VM. Ctrl-clicking acted as a right mouse button and all of the function keys worked. Parallels' Workstation also comes with a set of tools that installs within Windows to enable additional functionality, such as a clipboard synchronization tool. The sync tool allows users to copy from applications in one OS and paste into the other.
The CPU performance is quite good, running Windows within Mac OS X at near-native-PC speeds, although the VM only allows Windows XP to access a single core of the Core Duo processor. The VM uses one of the cores while the other core handles processing in the host OS. Parallels Workstation can run multiple instances of Windows and Linux in separate virtual machines.
Performance
All in all, the performance was surprisingly good. PC World’s WorldBench 5 testing tool confirmed that Windows performed on Intel Mac minis and MacBookPros about as well as on comparable PC laptops. See www.macworld.com/2006/04/firstlooks/xpbenchmarks/index.php. The problems listed in this column are minor and can probably be resolved with better drivers. Boot Camp and Parallels' Workstation 2.1 are, after all, only early beta releases. These applications are both good transition tools on the road to using multiple OSes on a single platform.
Beverly Rosenbaum, a HAL-PC member, is a 1999 and 2000 Houston Press Club “Excellence in Journalism” award winner. She can be reached at trumors@hal-pc.org.
|