|
|
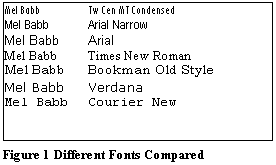
Make It Fit, Back Up Outlook 2003 Contacts, and Extra Shorts
|
|
9. Close the Control panel.
By the way, the steps above can be used to set up a profile so another person can receive their email in Outlook separate from your email. If you set up a real profile, you will need to put in the real email information on the setup screen. To switch between email boxes, close Outlook and open it again. A box will pop up where you select which profile to open.
Since you’ve created an account with “wrong” settings you will get a “receiving reported error…”. Ignore it by clicking Cancel All. Or Click File, Work Offline until you are done testing. Remember to go back in and turn off the Work Offline when you are done.
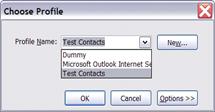
1. Close and open Outlook. Choose your test profile from the prompting box.
2. When Outlook opens, in the left pane click Contacts.
3. Click File, Import or Export. Next.
4. Choose “Personal Folder File (.pst)
5. Next. Click Browse and go to the folder with the exported file in it, for instance, My Documents/Contacts 2007-02-14. Next.
6. Check to see that all your contacts are there.
After you are satisfied that the backup is good, delete the test account. Click Start, Control Panel. In Control Panel, double-click User Accounts, and then click Mail icon. (If Control Panel shows all the icons in a list double-click Mail icon.). Click Show Profiles. Select the one to delete. Click Remove, Yes. If only one profile remains, Dot “Always use this profile” so you won’t have to make a choice every time Outlook opens.
For those who may want to export from a different program into Outlook, you will export the address book or contacts as a comma-separated-value (csv) or tab-delimited file, which may be referred to as either an rtf (windows) or txt (dos) file. When you export to these file formats, you have to export each contact folder and sub folder separately. Since two different programs are involved, you have to indicate the comparable field location in Outlook for each field in the exported file. So the import procedure into Outlook has a few more steps for these types of files where you “map” the fields from the exported contact fields (from say Hotmail or MSN) to Outlook fields. The import dialog boxes give instructions on how to map by dragging. When you import the main contact folder, import it into Personal Folders. When you import the subfolders, import them into Contacts so they will indent under contacts.
Just a couple of more observations--
A blue file name in a folder dialog box like My Documents or My Computer means a compressed file.
To close open programs all at once
Ctrl+Click on each program on the taskbar to select them as a group.
Right Click on any one of them, Click Close Group.
All the selected programs will close.
Of course, you can close each one separately, if you want.
Set menus to show all commands in each menu list in Microsoft Office
In any Microsoft program, Right click anywhere in the toolbar area.
Click Customize. Choose Options tab. Check “Always show full menus”
All the menu items will show instead of just a short list in all the Microsoft programs.
Till next time. Happy Computing.
Mel Babb © 2007
Mel Babb, a long time member of HAL-PC, is currently an instructor and on the Volunteer Help committee at HAL-PC. She runs her own company, PC Tutoring Services. See her website www.melpchelp.com. She comes to your office or home and creates notes for you on what you want to learn. Contact her at 713-981-5641 or email at mel@melpchelp.com © 2007

2008
November/December
2007
November/December
October
September
May
March
January
2006
Nov/Dec
October
July
June
May
April
March
February
Mel Babb, a long time member of Hal-PC, is currently an instructor and on the volunteer help committee at Hal-PC. She runs her own company, PC Tutoring Services. She comes to your home and creates notes for you on what you want to learn. She can be reached at melbabb@earthlink.net