|

|
OpenOffice.org Demystified - Part 3
Robert Spotswood
Writer – Paragraph and Character Styles
New Ways
Are you the typical MS Office user? Do you create a header by typing the header, selecting the text, then changing the font and size? Do you use the bold, italic, and underline buttons often? Do you press the Enter key twice to add extra space between paragraphs?
While those methods work in OpenOffice.org just as well as in MS Office, if you use them you're really missing a lot of the power of OpenOffice.org. You're also working too hard. To really harness the power, and labor-saving features, of OpenOffice.org, you need to learn about styles.
OpenOffice.org Writer has five types of styles: paragraph, character, page, frame, and list. Of these, paragraph is probably the most used. This installment of “OpenOffice.org Demystified” will cover paragraph and character styles. Other styles will be covered in future installments.
If you don't already have OpenOffice.org yet or you don't know what it is, you should take a look at part 1 (www.hal-pc.org/journal/2007/07_novDec/feature2.html) and part 2 (www.spotswood-computer.net/articles/OOo2_Getting_Installing2.php) of this series.
What are Styles?
A style, at least in OpenOffice.org, is a collection of attributes that describes an object. Anyone familiar with HTML and CSS should have no problem understanding styles. Styles are roughly the OpenOffice.org equivalent to CSS.
Paragraph styles describe paragraphs and character styles describe a set of characters smaller than a paragraph. In OpenOffice.org, a paragraph consists of all the characters up to an Enter key. It is possible for a paragraph to consist solely of an Enter, but this is usually an indication that you aren't using styles properly.
Styles differ from manual formatting which involves selecting the text, then using the formatting tools like font name, size, etc. With styles, you describe what a piece of text is rather than format it. For example, the first line of this article is a title. It’s not a piece of Arial, 18 pt, bold text, for example. The next line is a header, not a piece of Arial 14 pt text. Common style names include: title, text body, heading 1, heading 2, footer, header, etc. You describe the text, not the formatting. Each description has formatting associated with it, so by describing the text, you also format it.
Now some of you might be thinking this is a lot of extra work. Isn’t it easier just to manually format the text? For almost all documents, no. First and foremost, assigning styles to all paragraphs is actually fewer keystrokes and mouse clicks than most manual formatting, especially the more complicated formatting.
Secondly, using styles insures the document's formatting is consistent throughout the entire document. You don't have to remember whether the heading was 14 pt or 16 pt. Just assign the style and that’s taken care of automatically. Consistency throughout a document makes it easier to read and look far more professional and than a document with formatting randomly assigned.
Styles make formatting changes a snap. Suppose you need to change all the level 1 headings from Arial 16 pt bold to Palatino 16 pt regular in a 50 page document, either by your choice, or your boss/teacher just changed their mind. Maybe the client decided they want things done according to their style preferences, not your company's, or perhaps legal got a hold of the document.
Regardless of the reason for the change, if you used styles, just edit the style and reprint. The entire document is updated automatically. If you used manual formatting, you would have to manually go through every page and adjust the headings. Which would you prefer, a few seconds with styles or an hour or more of tedious work with manual formatting, hoping you didn't make any mistakes? Which saves time and effort?
Finally, there are several other tools in OpenOffice.org that depend on styles. Automatic table of contents generation, and updating, only happens if you use styles. The OpenOffice.org navigator doesn’t work without styles and PDF bookmarks are based on styles. Styles can even affect how the spell checker works. Smart people use styles.
Using Styles
To get you started using styles, we will work through a sample document, formatting it with styles. Start by downloading the sample document at www.spotswood-computer.net/samples/style_sample.odt. Load this document into OpenOffice.org. You will recognize it as an early version of this article, unformatted, without any figures, and probably a typo or two. Some the styles that come with this document have been tweaked from their default settings for this tutorial.
Should some of the text appear on screen to have a gray background, press “Ctrl F8” or go to “View” -> “Field Shadings” to remove it if it bothers you. This is field shading and does not affect how the document prints or exports. “Ctrl F8” is a toggle, so if you want to see the field shadings, press it to turn them on if they are off.
Clear Manual Formatting
There is some manual formatting in this document, like the title. Since we will be using styles to control the formatting, we need to get rid of all the manual formatting. Sometimes when you copy and paste from other sources you get manually formatted text and paragraphs, or perhaps you got a document from someone else who hasn't learned about styles. Either way, you will have to clear manual formatting sooner or later.
The quickest way to clear the manual formatting is to press “Ctrl A” or go through the menus “Edit” -> “Select All”. This highlights everything. Now go up to “Format” -> “Default Formatting” or use the keyboard shortcut “Ctrl+Shift+Space”. This will clear all manual formatting and character styles in the selected text, but does not change the paragraph style.
Apply the Text Body Style
Now that our document is a blank slate, formatting-wise, let’s start applying styles. Since most of the document is body text, we can save time and mass apply this first. This is quicker and less work than applying it to each paragraph individually. This will assign the wrong styles to some paragraphs, but as they are fewer, it is faster to go back and fix those later.
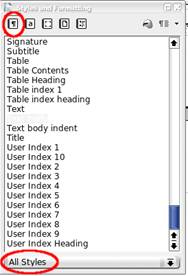
Figure 1: The Stylist. Be sure you use the options circled in red.
If all the text is not currently selected, press “Ctrl A” again. Now we need to bring up the Stylist. To bring up the Stylist, also known as the styles and formatting dialog box, either press F11, or go through the menus “Format” -> “Styles and Formatting”. At the bottom of the Stylist is a drop-down filter that allows you to change which styles are displayed. Beginners to the Stylist may want to set the filter to “All Styles”. Scroll down until you see the style called “Text Body”. Double click that style name to apply the style to the paragraph(s) covered by the current selection, or the paragraph the cursor is in if there is no selection.
Modifying the Text Body Style
For this document, the text style doesn't have extra spaces between the paragraphs. Let’s add some. Here is where most people would just press Enter to add an extra space. However, this is not only bad form, it is also unnecessary. The extra space can be added through modifying the style.
You do not need to have any paragraph(s) selected or the cursor in the particular paragraph(s) you want to change if you are modifying the style. Everything with that style instantly gets updated throughout the entire document. This is one way styles save you time and effort.
To modify a style, either right click on the style name in the Stylist and select modify, or right-click on a paragraph with the style you want to modify and select “Edit Paragraph Style” from the menu that comes up. The right-click method will not work if you right click on a word the automatic spell checker thinks is misspelled.
Figure 2: The style editor.
In the style editor, click on the “Indents and Spacing” tab. It is the second from the left. Here is where the spacing around the paragraph is controlled. Near the middle of this tab is the spacing section. This adds white space above and/or below the paragraph. These numbers are added with the numbers for the paragraph styles above and below any paragraph. If you set above and below to 0.05” and have two text body paragraphs together, then the spacing between the two will be 0.10” (0.05 +0.05). Different styles can have different spacing, but they still add together.
For this tutorial, set the spacing above to 0 and below to 0.10”, or whatever number looks good to you. You must press OK to see the changes, but don’t do that yet. Don’t worry about making mistakes as you can go back and change it whenever you want if the spacing is too much or too little.
Before we leave this tab, let's indent the first line of the text paragraphs. Above the spacing section is the indent section. “Before text” and “After text” are used for changing the page margins for just that style. The most common use is for offsetting block quotes. These numbers can be negative. For most styles, they should be 0.
Below those is the “First line” option. This is the one that will automatically indent the first line of the paragraphs with this style. You don't need to play with tabs. Set this to about 0.16”, or whatever looks good to you. Now click OK to see the changes made throughout the entire document.
Creating the Title
Now that the base formatting of the document is complete, the next thing this document needs is a title that looks like a title rather than part of the text. We need to apply a title style. Notice how the style name describes the text? Using styles for a single line of text may seem like a waste of time, but it gives you a consistency that manual formatting can't match, and you don't have play any text selection games. Plus, you never know when you will use this style again...
Place the cursor somewhere in the text on the first line. Open the Stylist again, double click on the style “Title”. If you don't see "Title" in the list, be sure to set the filter at the bottom of the Stylist to All. Now the title looks more title-ish, but it's still not quite right. That's OK, we can just edit the style.
Bring up the style editor as described in the above section, “Modifying the Text Body Style”. Let's center the title. Text alignment is controlled by the tab "Alignment". This is next to "Indents and Spacing". Select “Centered”.
Now let's change the font and font size. Since the text is in a serif font, we can use a sans serif font for the title and headers to help set it off from the text. Two tabs to the right of “Alignment” is the “Font” tab. Select Arial, or a similar font if you don't have Arial, the select bold under typeface and make it 18 pt.
If you don’t see pt sizes, but percentages instead, just type “18 pt” (no quotes) in the box below the word size. OpenOffice.org allows you to either use pt sizes or percentages in the font size. By typing in one of the units in the box, you can switch between the two. Try typing “140%” (again, no quotes) in the box to switch to percentages.
We can set off the title, and later the headers, even more by applying a slight color change. Note the word slight. Lots of bright, vibrant text colors don’t say professional document. They say “Day at the Circus”. Bright, vibrant colors can work for ads, greeting cards, posters, etc., but not for documents like tutorials, articles, reports, books, etc.
To change the color of the text, click one tab to the right of “Font” called “Font Effects”. Here you can change and apply a great many font decorations to the style. Remember to use them sparingly!
The "Font color" selector is set to automatic which is the same as black unless you've taken steps to change it. Select this and pick the first blue color which is labeled “Blue”. This is a dark blue that doesn’t look bad next to the black of the text. Now click OK to see the changes.
Applying the Header Styles
Now we apply some header styles to the document. For this tutorial, we are only using the styles “Heading 1” and “Heading 2”. Open the Stylist and select the style “Heading 1”. Now put the cursor anywhere in the paragraph/line New Ways and double click on the style named “Heading 1”. Notice how it changes? Now repeat the process for What are Styles? and Using Styles.
Since we have already used the style “Heading 1”, it is now available from the apply style toolbar. Put the cursor anywhere in the paragraph/heading Conclusion near the bottom and from the apply style toolbar select “Heading 1”. You have now added all the “Heading 1” styles.
Figure 3: Fill format mode button circled in red.
Another way of adding styles to many paragraphs quickly but selectively is to use the “Fill Format Mode”, or style painter. In the Stylist, at the top, second from the right is an odd little symbol that is supposed to look like a paint can spilling paint. When you click this, the cursor changes shape and you can point and click your way to adding paragraph styles. It also works for non-paragraph styles, but not as well.
Open the Stylist and click on the “Fill Format Mode” button. While in this mode, whatever style is selected in the Stylist will be applied where ever you click. For paragraph styles, you only have to have the cursor anywhere in the paragraph to apply the style. You can change styles while in “Fill Format Mode” by selecting a different one in the Stylist. This will not change any styles already applied. Now single click on the style “Heading 2”. Now scroll through the document and click on the rest of the headers in the following list: Apply the Text Body Style, Modifying the Text Body Style, Creating the Title, Applying the Header Styles, Style Dependencies, Changing the Text Flow, and Adding Character Styles.
Yes, we skipped Clear Manual Formatting on purpose. Notice how all the headings are numbered automatically. This is from the style. Now for some magic. Suppose you, or someone else, wants to add a new section, with a heading of course. Does this mean you have to back through the document and renumber everything? If you use styles properly, then no you don’t. Here the skipped heading Clear Manual Formatting will serve as the “added” section.
Go to the Clear Manual Formatting, put the cursor on that line anywhere in the text, and from the style pull down menu, select “Heading 2”. Notice how it and all the other styles are numbered properly with no effort on your part? This is another reason to use styles.
Style Dependencies
Now we need to make some changes to the header styles. For this tutorial, we are only using the heading styles “Heading 1” and “Heading 2”. For consistency, we want them both to be the same font and color as the title. Since there are only two styles to change for this tutorial, we could do them individually. However, by default, OpenOffice.org Writer comes with ten header styles numbered one through ten and you can add more if needed. Changing ten individually is a lot more work. So let's take the shortcut.
Styles can depend on, or be linked to, other styles. This means changes made to one style are automatically duplicated in other styles. Open up the Stylist again and take note that there is one style called “Header” with no number. That is not a mistake or a bug. Right click on any header style with a number and select modify.
On the left side is a tab called “Organizer”. The “Linked with” option chains styles together. Whatever option you change in the “Linked with” style is copied to this style. For instance, if the style you are modifying is linked with the style “Header” and you change the font and font color in “Header”, then this style takes on that font and color too. Only the options you change are copied. Everything else is left alone. Press Cancel to get out of the style editor.
Since all the numbered header styles are linked with the style simply name “Header” (no number), we can just change “Header” to change all the other header styles. Therefore, in the Stylist, right click on “Header” and modify it.
As we did for the title, click on the font tab, and pick the same font you used for “Title”, probably Arial. Next, click on the “Font Effects” tab and change the “Font color” selection to blue as you did for “Title”, but do not click OK yet!
Changing the Text Flow
Before we close the editor, there is one more change we should make. OpenOffice.org Writer, like pretty much every other word processor, automatically decides where page breaks should occur. But sometimes they don’t happen quite where they should. A header at the bottom of the page, all by itself, with no accompanying text is disruptive to the reader. Anything disruptive makes reading the document harder. Hard-to-read documents are not as well received as easy-to-read documents with the exact same content.
In order to better control the text flow, click on the tab “Text Flow” and check “Keep with next paragraph”, third option up from the bottom. This tells OpenOffice.org Writer to never add a page break between any paragraph with this style and the next paragraph. If necessary, Writer will move both paragraphs, together, to the next page, leaving extra white space at the bottom of the previous page.
This extra white space does not disrupt reading, and usually only typesetters and really, really, bored people will even notice it. This option should be used sparingly and usually only for header paragraph styles. Click OK and notice how all the headers are changed, and perhaps even where the pages break.
If desired, you can now make individual changes to the header styles “Header 1” and “Header 2” just as you would for any other paragraph style. You can even change the options you just set via the “Header” style. No further header changes will be covered in this tutorial, but you are free to experiment on your own.
Adding Character Styles
Under Using Styles, there is a URL (web address) to the sample document. If we run this through the spell checker, it is going to flag this as containing several misspelled words, even though they aren’t really misspelled. However, by applying a character style, we can change that.
Open up the Stylist once more and select the character styles, second button from the left. Be sure “All” is selected at the bottom. We are looking for the character style "Internet Link". Let's modify this style.
Figure 4: Character Styles
Once you've right-clicked and selected modify, you will notice that the character style editor has far fewer tabs, and options, than the paragraph style editor. This is normal. However, all the options that are present work the exact same way as their counterparts in the paragraph style editor, except they only apply to a set of characters and not entire paragraphs.
First, select the font tab. In about the middle of the tab is the language selection. It probably says “English (USA)”. Change this to “None”, which is at the top of the list. Writer allows you to mix multiple languages in one document. Setting the language for the style tells Writer which dictionary, if installed, to use when spell-checking that section of the document. By setting the language to “None”, the spell checker will skip that section altogether, thus eliminating the false misspelled words alert(s). This works for paragraphs too, should you want to selectively skip spell checking.
Next we select the “Font Effects” tab. Since traditionally links on the web are in blue, let’s follow that convention here. The blue color we used for the title and headings is too dark and we don’t want to use the same color as the headings anyway. It will confuse the reader (“Is this a mis-formatted heading???”). Instead, select “Light blue”. Now click OK.
Figure 5: The Style Editor for character styles
The final step is applying the character style. Select the entire URL by clicking and dragging. You can click and drag left-to-right or right-to-left. It makes no difference. If the URL is next to a page margin on either side, it's easier to put the cursor outside the margin and start your click and drag from there. Once you have the URL selected, double click on the character style “Internet Link” in the Stylist.
Conclusion
Using paragraph and character styles may, at first glance, seem like more work. But for all except the shortest of documents you don’t even bother to save, it will save you time and effort in the long run while making your documents look more professional at the same time. At little practice and using them will be second nature. Creating templates with the styles already set up can save you further time and effort.
There are a great many options for paragraph styles that aren’t covered in this tutorial. You are encouraged to explore them on your own. The help file that comes with OpenOffice.org can assist you in figuring out what the various options do.
In part four of this series, we will cover numbering and lists in Writer. These are something a great many people use, but few master. See you then!
Robert Spotswood, a HAL-PC member, is active in the Linux SIG and a freelance computer professional. He can be reached at robert@spotswood-computer.net.
|