How to create a PowerPoint Show of Pictures with Music
by Mel Babb
This column will cover features, some new some old, often overlooked by computer users, both new and long time users. We’re hoping you will incorporate at
least one of the tips. We’d love to hear from you about what you find helpful. If you have any suggestions about what you would like to see covered, please email Mel Babb
at melbabb@earthlink.net. Please, include your phone number so she can call you about it.
Now that you have a whole bunch of digital pictures that you want to organize and show off. Here’s a way for you to put a selection of your pictures into a
slide show and add music to it. To distribute the show, it’s best to compress the pictures and pack the presentation. So plan on spending a couple hours going through the
steps here to create your first presentation. After that you can whip these things out in a few minutes. By taking you through this project, you will learn all kinds of ways
to work with a slide show that can come in handy with whatever presentation you create.
1. Open a blank presentation in PowerPoint
2. Click Insert, Picture, New Photo Album
On next screen, click in section “Insert picture from:” File/Disk
Navigate to where pictures are stored
Click first picture you want.
To select a group of adjacent files,
Shift+Click the last file you want.
To deselect certain files from the group, Ctrl+Click the files.
To Select non-adjacent files,
Click the first file, Ctrl+Click each additional file.
Click Insert.
Move the pictures up or down here (or you can do it later in slide sorter view).
At bottom pick options you want.
To put a caption on the picture choose 1 picture with title.
Choose the Frame shape,
Click Create,
3. Type in title for presentation on first slide.
4. On first slide to add music that will play throughout the presentation
Click Insert, Movies and Sounds,
Sound from file Choose the music file you want
Right click on sound icon on the slide. Edit sound object
Click “Hide sound icon during slide show” OK
See Screen Shot 1
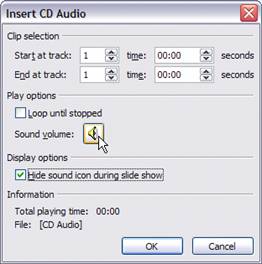
(If you choose Play CD Audio Track, you have these steps
Insert CD into computer CD player
If a Music player program appears, Click Cancel
Click Insert, Movies and Sounds, Sound from CD
On next screen, Click sound volume icon and adjust volume
Click “Hide sound icon during slide show” OK
Click Automatically (so music starts when show starts).
Music Icon appears on slide)
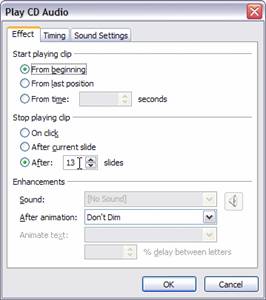
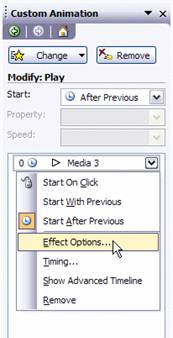
Screen Shot 2: Right Click sound icon. Choose Custom Animation
5. Right-Click Sound icon, Choose Custom Animation
Click on Media (3). A drop down arrow appears.
Click drop down arrow. A menu appears.
Click Effect Options
In next Screen, under “Stop playing clip” Click in blank “After” and type in the number of the last slide (shown in
lower left of screen). Screen Shot 2
Click OK
6. Add Slide Transitions
Switch to Slide Sorter View (Click View, Slide Sorter)
Select all the slides (Press Ctrl+A)
Click Slide Show, Slide Transition
Pick the transition and speed (The last one is random, a good one to use for variety.)
Check “Automatically after” and type in how many seconds to show each slide
Click Apply to all slides
7. Add a Background color (so blank areas will not be white).
Click Format, Slide Design
At top of right panel, Click “Color Schemes”
Thumbnails of various schemes appear.
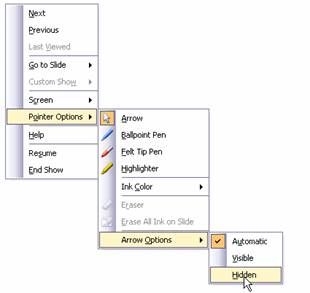
Screen Shot 3 Start show. Right click and choose Pointer Options, Arrow Options, Hidden
Click on one with a background color like or similar to what you want
At bottom of panel, click Edit Color Schemes
Click Change Color
Click dots to arrive at color you want, Click Apply.
8. Hide Pointer when you run show
Start show. Right click and choose
Pointer Options, Arrow Options, Hidden Screen Shot 3
Screen Shot 3 Start show. Right click and choose Pointer Options, Arrow Options, Hidden
9. Rehearse Timing of slides to music
Click Slide Show, Rehearse Timing
Click every time you want slide to change
Elapsed Time shows in upper left corner
At end Click Yes
In slide sorter view, the transition and time of each slide is shown.
Click on the Transition icon  to see the transition to see the transition
To change Transition and/or time for a slide,
Right Click on slide and choose Slide Transition
Make changes in panel at right.
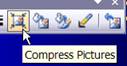
10. Compress pictures to reduce size of file
File size can be reduced to about ¼ the size it was.
Select any picture, (in View, Normal) and a picture tool bar appears
Click the Compress picture icon Screen Shot 4
Dot “All Pictures in document”
Dot the “Web/Screen” resolution, OK
11. Package the presentation for File or CD
To distribute the presentation in an email or give it to someone on a CD, you need to “package” it using a command from the File menu. The music file becomes part of
the package. You can read about other options, like password protection in PowerPoint help.
Here’s how to package your presentation to a file so you can send it in an email. To keep the file small, we will not include the PowerPoint viewer, needed by those who do
not have PowerPoint. The viewer is free and can be downloaded at www.microsoft.com/downloads. Click Office in the last column to get to the page with the viewer.
With the file open in PowerPoint, Click File, Package for CD
Type a name limited to 16 characters
Your presentation is already selected along with the music file.
Click Options and uncheck PowerPoint Viewer, OK
Click Copy to folder. Browse to change location of file if you want, OK. Close.
A folder is created that holds the packaged file(s)
All you need to attach to an email is the ppt file in the folder
Till next time. Happy Computing.
Mel Babb © 2006
Mel Babb, a long time member of Hal-PC, is currently an instructor and on the volunteer help committee at Hal-PC. She runs her own company, PC Tutoring Services. She comes
to your home and creates notes for you on what you want to learn.
|