Write Your Memoirs In Style Using Word 2003
Mel Babb
This article covers more advanced material in Word and is more oriented to Word 2003 than many of my other articles.
A seldom used but nifty feature to master and use when writing long documents like a manual, brochure, family history, or your personal memoirs is Styles. A style is a collection of formatting characteristics, given a name, so formatting can be applied quickly and consistently. A smart use of styles will make your writing life easier. Word comes with a whole bunch of styles built in to help you number lists, add bullets, format headings for chapters. To see the styles, Click the Styles and formatting icon on the toolbar  next to the style list box that says Normal by default (or click Format, Styles and Formatting on the toolbar). A pane appears on the right with the basic styles. (To see all the icons on your toolbar, Click View, Toolbars, Customize. On the option tab Check the first two items, Show… toolbars on two rows, and Always show full menus). Note that Word 2003 works differently than earlier versions of Word, particularly in the modifying of styles. All you’ll see initially are a few of the styles. To see them all, in the show box at the bottom of the pane, choose All styles. next to the style list box that says Normal by default (or click Format, Styles and Formatting on the toolbar). A pane appears on the right with the basic styles. (To see all the icons on your toolbar, Click View, Toolbars, Customize. On the option tab Check the first two items, Show… toolbars on two rows, and Always show full menus). Note that Word 2003 works differently than earlier versions of Word, particularly in the modifying of styles. All you’ll see initially are a few of the styles. To see them all, in the show box at the bottom of the pane, choose All styles.
First we’ll examine and use a built-in style, then let Word auto format the document. Next I’ll give you a tour of the Styles and Formatting task pane. Finally, we’ll see how to change the characteristics of a style and create new ones. To help you understand how styles work, open a long document of your own, save it with a different name (so you don’t mess up the original) and try out what I’ll be describing as you read this.
Here’s an example of what a built-in style can do versus one you create: Instead of having to go through all the keystrokes to apply formatting to a section or chapter heading, use the Heading 1 style built into Word by clicking on the Heading 1 name in the style box after selecting the line. Instantly formatting is applied. The font is Arial 16 point (pt) bold. Extra space is added before the line 12 pt and after it 3 pt, to set the heading off from the rest of the text. A special instruction, Keep with next, is added which means the heading will move to the top of the next page, if it is on the last line of the previous page. The item is coded, Level 1, so it can be used by the outline, search, and table of contents features. If you were hand-formatting the heading, you would probably add the font and put an extra enter before and after the line, which would add 12 pts before and after the line. This will look okay but not as stylish (grin) as having 12 pt before and 3 after. Not having the functionality of keep with next and Level 1 would not be evident until near the end of your document production, when you would have to hand edit and manually create a table of contents.
 The next most common style to use in a long professional document is Body Text. This will add an extra 6pt between paragraphs in addition to the 12 pt that is added when you press the enter key to add a line. So you don’t have to add an extra enter between paragraphs anymore. The next most common style to use in a long professional document is Body Text. This will add an extra 6pt between paragraphs in addition to the 12 pt that is added when you press the enter key to add a line. So you don’t have to add an extra enter between paragraphs anymore.
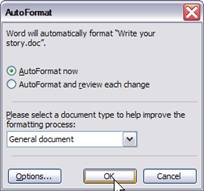
By the way, if you already have a long document written without using any of the built-in styles, you can use an automatic formatting feature to add them for you. Then you can refine from there. Click on Format, Auto Format. Leave all the settings as is. Click OK. Styles will be applied. Extra lines will be removed and replaced by the extra space specified in the style, like in the Body Text, the line between paragraphs will be deleted and an extra 6 pts will be added to the paragraph. You will still have to go through the document and adjust a few things that did not format the way you wanted them to.
How the Styles and Formatting Pane Behaves
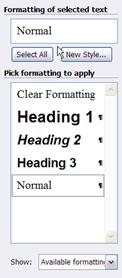
Before going into how to change and create styles, let me describe how to interact with the Styles and Formatting pane. It is “touchy” to say the least. At the bottom of the pane is a show box. Select All styles from the drop down list so you can see all that come built-in. If you just point at a style name in the pane, a tool tip displays describing all the formatting used in that style. Also, a drop down arrow appears on the right when you point at a specific style. The little symbol is covered up by the arrow. The symbol indicates what category the style belongs to, like character or  paragraph. The character style will only change the text selected. The paragraph style will apply to the whole paragraph, even if the cursor is just in the paragraph. The quickest way to remove character formatting, once you apply it is to press Ctrl + Spacebar. To return to the normal paragraph style Press Ctrl+Shift+N. paragraph. The character style will only change the text selected. The paragraph style will apply to the whole paragraph, even if the cursor is just in the paragraph. The quickest way to remove character formatting, once you apply it is to press Ctrl + Spacebar. To return to the normal paragraph style Press Ctrl+Shift+N.
Changing the Style to Your Taste
If you don’t like the font or want different spacing between lines, you can modify the built-in style to fit your tastes and needs. This will only affect the style in this document. An easy way to do this is to make the changes to what you want. Then in the Styles and Formatting pane click the down arrow next to the style you are changing and select update to match selection. Here’s where something very nice happens. Wherever you have applied that style will update, too. So if you have 10 chapters with Heading 1 style on them and you change the font or the size of it in one place and choose update to match selection, all ten headings will change. Of course, if you just want that one instance to be different, just manually make the formatting changes.
Creating a new Paragraph Style
 To be sure you get the results you want, turn on the show/hide marks by clicking the paragraph icon on the toolbar so you can see where the paragraph marks are in your document. The formatting instructions for the paragraph are stored in this mark. The easiest way to create a paragraph style is to format the text just the way you want it. Just have the cursor in the formatted paragraph to create a paragraph style. Click in the Styles box on the toolbar and type a name for the style. Press enter to record it. I’ve right aligned some italicized text and put a box (borders) around it. To make the border fit where I wanted it I made a 5” indent from the left. Here’s the result: To be sure you get the results you want, turn on the show/hide marks by clicking the paragraph icon on the toolbar so you can see where the paragraph marks are in your document. The formatting instructions for the paragraph are stored in this mark. The easiest way to create a paragraph style is to format the text just the way you want it. Just have the cursor in the formatted paragraph to create a paragraph style. Click in the Styles box on the toolbar and type a name for the style. Press enter to record it. I’ve right aligned some italicized text and put a box (borders) around it. To make the border fit where I wanted it I made a 5” indent from the left. Here’s the result:
Make a new style
When it was all formatted I just clicked in the Style box on the toolbar and named it Right align w box.
Creating a new Character Style
Let’s create a style for a company. Santa’s Stash. This has Elephant 10 pt italic, blue for a font. Since this will be a character style, select just the text without the paragraph mark to create it. In the Styles and formatting pane click the New Style button. Type a name for the style in the Name blank and change style type to character. You can add any additional formatting you like here. Click the format button and make your choices. Click OK when finished.
Applying Styles
In the Styles and Formatting pane all you’ll see initially are a few of the styles. To see them all, in the show box at the bottom of the pane, choose All styles. There is a style for all kinds of things that you will not use from this box, like the table, list and bullet styles. Once you are familiar with the ones you want to use, rather than scroll and pick from the pane, click in the style box on the toolbar, type the first few letters for the style you want. and it will show in the box. Use the up and down arrow key on the keyboard to move
up and down in the list. Or click the drop down arrow on the style box and scroll. Or combine the methods to quickly get to what you want. (I prefer keystrokes so I can give my mousing hand a rest). Unfortunately there’s no way to type in the task pane. It’s only scroll and click.
Create a Table of Contents
When you are done with your opus, go to the beginning of your document and add a page (Press Ctrl+Enter). Click Insert, Reference, Index and Tables. Pick the Table of Contents tab. Accept all the defaults, for now and click OK. Voilà! You have a table of contents.
Getting Help
Much more can be said about styles and as you use them you will find it helpful to reference help in Word. You can go directly to Microsoft Office Online from the Help menu. This is the way the site is set up now. It changes often, so when you get to a page you want be sure to bookmark it (save it as a favorite). Click the Help and How-to tab. Scroll to the middle and Click the Office 2003 tab and click Word. Type styles in the search box in the upper left corner and pick what you want to learn. Let me know how you make out with styles and contact me if you need help.
Till next time. Happy Computing.
Mel Babb © 2007
Mel Babb, a long time member of HAL-PC, is currently an instructor and on the Volunteer Help committee at HAL-PC. She runs her own company, PC Tutoring Services. See her website www.melpchelp.com. She comes to your office or home and creates notes for you on what you want to learn. Contact her at 713-981-5641 or email at mel@melpchelp.com © 2007
|