Printing Better Pictures, by Robert Spotswood
When a dot is not a dot
Have you ever tried to print out a picture that looks good on your monitor only to be disappointed with the result? Does it come out way smaller/bigger than you expected or look really grainy?
This is not a random act by your computer. In order to understand why it happens, and more importantly, be able to prevent these problems, you have to understand when a dot is not a dot.
This is not an easy subject to grasp initially, but if you play with it just a little, the light bulb will light and it will become almost second nature very quickly.
Conventions
There are two types of graphic images: bitmap and vector. This article focuses exclusively on bitmaps. If in doubt about which type your picture is, it's probably bitmap. Bitmap pictures are composed of a series of dots called pixels.
While the terms DPI (dots per inch), PPI (pixels per inch), and SPI (samples per inch) technically have different meanings, in practice they are all interchangeable. Only DPI will used in this article.
Any printer referred to is limited to the inkjet variety unless stated otherwise, although almost everything here applies equally to laser printers. Although this article focuses on examples using the GIMP, all the theory and much of the practice applies
to almost all graphic software.
Monitors
Your monitor displays everything as a series of dots, regardless of the picture type. For instance, if your screen size is 800x600, then you are looking at 800 dots by 600 dots. The dots can be almost any color and they do not have a fixed size. A typical
17" monitor can have screen sizes from (at least) 640x480 to 1280x960. Since the physical size of your monitor can't change, the size of the dots must change. The more dots you have making up your screen, the smaller those dots will be.
As far as your monitor is concerned, one pixel (see the definition of pixel above) equals one dot. Because the icons (including text) and wallpaper on your desktop are composed of a fixed number of dots, shrink those dots and the icons and wallpaper
get smaller (see Fig. 1 and 2). Be aware that most desktops have a scaling feature for the wallpaper, called stretch in Windows, so you may not see the wallpaper actually change size if this feature is turned on. However, the quality of your wallpaper
may go down dramatically if the wallpaper's actual size is small and you increase the screen size too much.
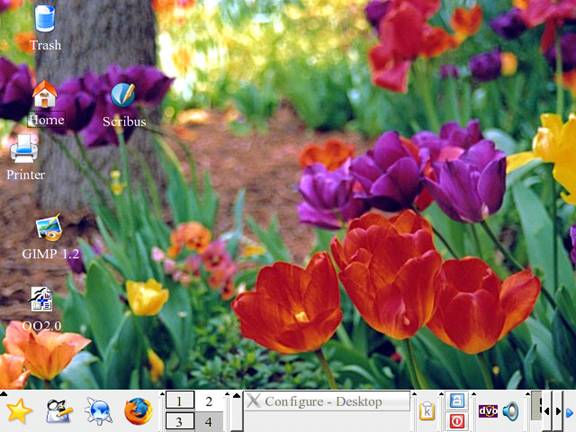
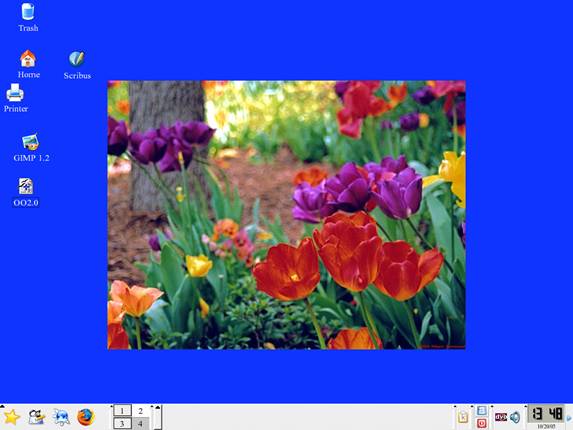
Figure 1 (above) A 640x480 wallpaper on a 640x480 screen.
Figure 2 (below) A 640x480 wallpaper on a 1024x768 screen.
The same thing applies to any pictures you may have. A picture with 640x480 pixels will display fully (at 100% resolution) on any screen size at least 640x480. A picture 1600x1200, on the other hand, will require scrolling on any screen smaller than
1600x1200.
Printers
Printers, like monitors, create the printed picture/output image by using a set of dots. But that is where the similarities end. Unlike a monitor, a printer's output isn't a screen with variable size pixels, but a piece of paper with fixed dimensions.
Paper is measured in inches, not pixels.
Printers create the image (and text) by using a grid of dots. The number of dots the printer can make in one inch is what's known as DPI or Dots Per Inch. Obviously, the higher the DPI, the better the output the printer is capable of. A higher DPI means
more detail and a lower DPI means less detail. If the DPI is set to low, the picture will look very grainy and poor. For a normal piece of paper, the graininess usually starts to show somewhere below 200 DPI. For things like highway billboards, the
DPI used can be from 36 to 72 DPI.
Unlike a monitor, the dots are of a fixed color. A black and white printer cannot actually print gray, but only black. The paper is usually white, so white is just the absence of printing. Grays are simulated by printing dots in a grid. These grids
are called halftones. Newspapers use halftones that are very coarse and usually visible even without a magnifier. The more black pixels, the darker the gray. Conversely, the fewer the black dots in the grid, the lighter the gray will be. Thus, one image
pixel can require several printer dots. Some printers are capable of varying the size of the printer's dots, but for simplicity's sake, this will be ignored.
The size of the grid and the max DPI of the printer affect how well the printer can reproduce shades of gray (and color). Gray includes the colors black and white. For a 1200 DPI printer:
A 1x1 grid shows 2 shades of gray with an effective DPI of 1200 (1200/1 aka line art).
A 3x3 grid shows 10 shades of gray with an effective DPI of 400 (1200/3).
A 6x6 grid shows 37 shades of gray with an effective DPI of 200 (1200/6).
An 8x8 grid shows 65 shades of gray with an effective DPI of 150 (1200/8).
Thus, the more shades of gray you need, the more image detail you have to give up, or the more detail you want, the fewer shades of gray you will get.
Color printers are similar to black and white printers except they usually have four ink colors (CMYK - Cyan, Magenta, Yellow, and blacK). Instead of orderly grids, color printers use dithering (with error diffusion).
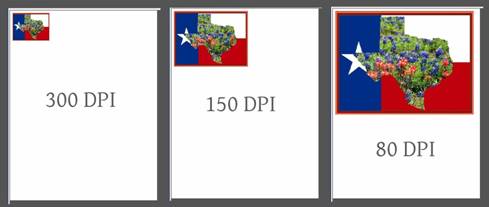
Figure 3 (above) The exact same picture printed at 3 different DPI’s.
Dithering is the use of somewhat randomized scattered dots. This tends to look smoother than grids, but the theory is similar. One image pixel can require several printer dots.
In practice, the upper limit for inkjets comes about because the dots of individual color become larger than the grid to hold them. In addition, the ink can bleed, especially on regular paper (photo paper lessens this problem). The practical upper limit
is (on good photo paper) between 240 to 300 (maybe 360) DPI. On regular paper, due to ink bleeding, 150 DPI is about as good as it gets. For other than inkjet printers, try not to go much below 200 DPI if you want a good print out.
Converting between the effective DPI (which is the same as the DPI you or the software pick), the printer’s max DPI, and picking the colors to use at a given DPI is handled by the printer driver and not something you can really change. Just be
aware that using a high DPI may not give you the detail, or color reproduction, you expect.
DPI and Print Size
In addition to affecting the number of colors, DPI also affects the physical size of the printed picture. The print size on paper is determined by two things: the number of pixels in the picture and the DPI setting used by the software for that picture.
Some software and some file formats do not support changing the DPI setting. Some programs do support changing the DPI and just don't mention the term DPI (or PPI or SPI). Some programs such as desktop publishing software and word processing software
will show you a WYSIWYG version of your picture at its relative print size. This is usually based on the DPI of the picture.
The physical print size is just the picture size (in pixels) divided by the DPI. For instance, a 400x800 pixel picture printed at:
100 DPI will be 4 (400/100) inches x 8 (800/100) inches
200 DPI will be 2 (400/200) inches x 4 (800/200) inches
300 DPI will be 1.33 (400/300) inches x 2.66 (800/300) inches
Figure 3 shows the same picture (640x480) printed on letter paper using 3 different DPI values. The only thing changed between the three is the DPI. As you can see, the higher the DPI, the smaller the picture. This is another reason that trying to print
at your printer's maximum DPI is not the best choice.
Setting the DPI in the GIMP for versions 1.2 is done by right clicking on the picture and choosing "Image" -> "Scale Image" and setting either the DPI or the print size (see Fig. 4). The DPI is called "X resolution" and "Y
resolution". Both the X and Y values should almost always be set to the same number. As you change one, the other will automatically adjust. As mentioned above, DPI and print size are intertwined and one can not change without the other changing.
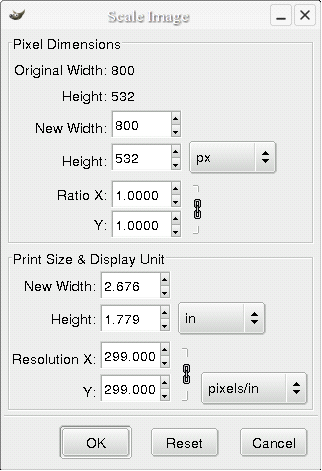
Figure 4 (above) The GIMP 1.2 DPI and print size control.
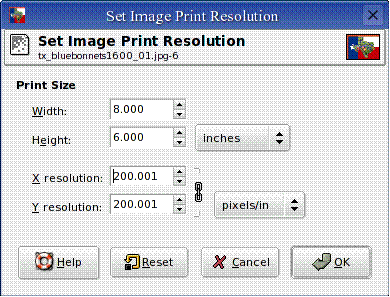
For the GIMP 2.2 (everyone using version 2.0 should upgrade to 2.2) the DPI (or resolution) control is found in "Image" -> "Print Size" (see Fig. 5 and 6). While it is also found under "Image" -> "Scale Image",
do not use it there. It is too easy to change your picture size by scaling accidentally.
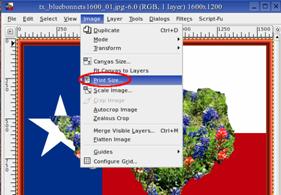
Figure 5 (above) Getting to the GIMP 2.2 DPI and print size control.
Figure 6 (below) The Gimp 2.2 DPI and print size control.
Conclusion
By understanding DPI and how to control it, you can dramatically improve the quality of your printed pictures. Say "goodbye" to accidentally printing posters and postage stamps. Say "hello" to better printouts.
Robert Spotswood, a HAL-PC member, is active in the Linux SIG and a freelance computer professional. He can be reached at robert@spotswood-computer.net.
|