|
|
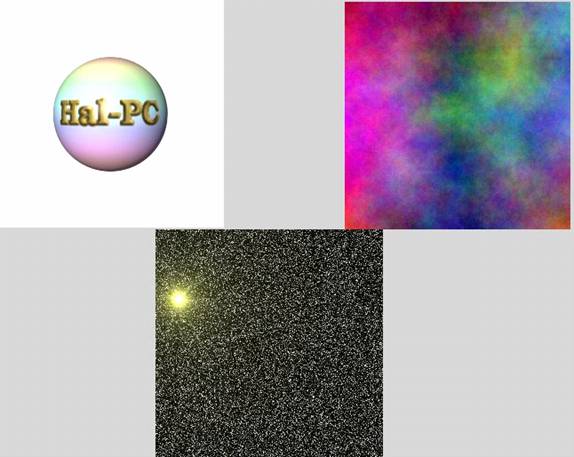
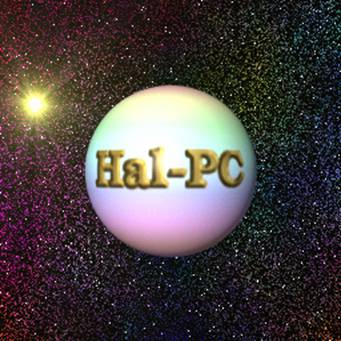
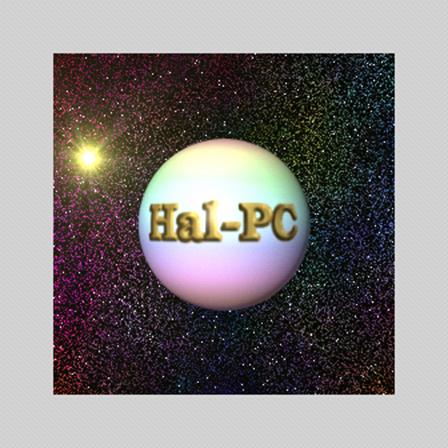
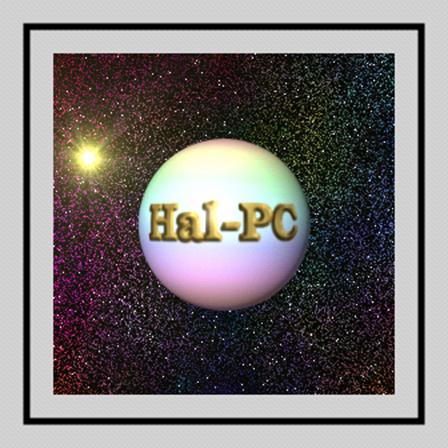
The GIMP, by Robert SpotswoodFraming with the GIMP Art consists of limitation. The most beautiful part of every picture is the frame. --G. K. Chesterton Pictures need frames. A good frame can turn a mediocre picture into something people would be proud to hang on their wall. The problem is, good frames cost money, sometimes more than the art they contain. Just because your picture is digital doesn't mean it doesn't deserve a frame. In fact, sometimes, a digital frame can be really useful. It can make a small picture seem bigger and more impressive. If you are going to have prints made of your digital photos, it can help avoid bands on the sides/top of the photos. These bands occur because the aspect ratio, or length/width ratio, is not the same for digital photos and print photos. This is true before cropping comes into play and often true afterwards. Digital frames, like those in the physical world, can take many shapes and forms. Rectangular shapes are the most common and will be the only type covered in this tutorial. In order to understand how best to create a frame, an introduction to layers, as well as canvas and image sizes is needed. This may seem a little dry, but understanding these concepts will help with more than just creating a picture frame. A great many effects depend on layers, and layers are found in other applications, not just in the GIMP. Layers Layers can be thought of as clear sheets you can stack on top of each other. Each one can have something drawn on it and the result is the composite of all the layers. Figure 1: The sources for Figure 2. Hand drawn animation was done this way. However, unlike clear sheets, there are a number of different ways a computer layer can affect the way those layers below it appear. In the GIMP, this is called the mode, but won't be covered in this tutorial. Layers can be re-arranged as needed or desired. They can also be deleted without (directly) affecting the rest of the picture, or their visibility and effects, can be turned off (and back on) if desired. This is useful in case you are not sure whether you want to keep the change or not. Undo has a limited history, but the layer can be deleted, moved, or made invisible as long as it exists. Being able to turn on and off the visibility of layer quickly allows for easy comparison between two images as well. Figure 2 below is composed of 3 layers. Figure 1 is a picture of each of the layers. The planet is the top layer, the stars and sun the middle layer, the colorful layer is the bottom. The middle layer is partially transparent, but that isn't discernible from Figure 1. Some of the dots are actually areas of transparency with the gray background showing through. The white area on the top layer represents a transparent area.
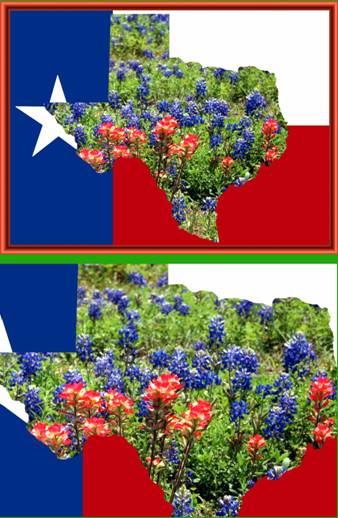
Figure 2: The final (reduced) composite image. Not all picture formats support layers. JPG, GIF, PNG, BMP, and TIFF do not support layers. If you save the picture in any of these formats, the layer information will be lost (called flattening the image). However, you can load any of these formats and add layers. It's only when you save that you lose the layers. The GIMP's native file format, XCF, does support layers. Canvas and Image Size Canvas and image sizes are related to layers and each other. The canvas size is the boundary of your picture. Nothing outside of it is viewable. Image size is how big the picture is. Nothing outside of it is viewable either. The actual canvas size and image size, in pixels, are always the same. While canvas and image sizes may seem to be the same thing, there is one very important difference between the two. Changing the image size affects the scale of all the layers, either enlarging or reducing them, along with everything they contain. Changing the canvas size does not scale any layers, but either adds new empty space (enlarging), or hides part of the picture (reducing), but does not change the scale of the contents of the picture. To help illustrate this point, Figure 3 contains two copies of the same starting picture, separated by a green border. The top picture had its image size reduced by 1/3, while the bottom picture had its canvas size reduced by 1/3. They are no longer the same picture. This is the difference between image size and canvas size.
Figure 3: Image size reduced (top) vs. canvas size reduced (bottom) Each layer has its own dimensions and they do not have to be the same as the size of the picture or even the same aspect ratio, although most of the time they are. In the Gimp 1.2, you can only convert the layer size to the image size, which is essentially changing the canvas size of the layer to match the image size. In addition, in The GIMP 2.0 you can also scale any layer independently of the other layers. This is like adjusting the image size, but only for one layer. Your First Frame Frames can be simple or a work of art in and of themselves. This tutorial will start with a simple frame then build it up. First pick a picture you want to frame, like Figure 2 above (which can be downloaded from www.spotswood-computer.net/images/gimp_art.jpg). It may seem like a lot of work to add a frame, but once you understand what the various tools do, you'll be able to add one in a matter of a few seconds. Adding one that looks good may take a little more time. First, decide how big the starting picture should be. If necessary, use the Image -> Scale Image command to adjust the size downward. Once you are satisfied with the base picture, it's time to expand the canvas to make room for the frame. Right click on the picture and select Image -> Canvas Size. This will open a new dialog box (see Figure 4).
Figure 4: Enlarging the canvas size Adjust the new width (or height) to a new size. In this case, 336 was chosen. Adjust to your taste. If you want to adjust the width and height independently of each other, click on the little chain button (circled in red). A broken chain means you can adjust each one independently. An unbroken chain means the aspect ratio will be preserved. The offset dialog on the bottom of the Canvas Size menu (Figure 4) controls the position inside the “new” picture where the "old" picture appears. Note that, unlike your high school geometry, these offsets are measured from the upper right corner, not the "normal" lower right. For frames, we usually want it in the center, so click the center button (circled in green) to automatically set the x and y offsets. Then click the OK button to finish. You will now have your original picture with a checker board pattern around it (see Figure 5). The checkerboard pattern is how the GIMP represents a transparent area. It won't print or show up in another application that views the image.
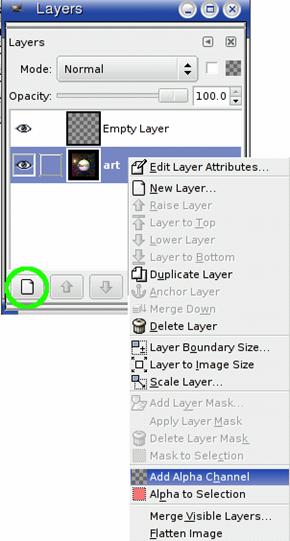
Figure 5: The expanded canvas Now come the layers. Open the Layers dialog box (Ctrl-L will do it, or right click and navigate the menus). There should be only one layer currently. We need to add an alpha channel. An alpha channel is what allows a layer to have transparency. Right click on the layer and select “Add Alpha Channel”. If it is grayed out, you already have an alpha channel. The little thumbnail of the picture will now change to reflect the transparent area added with the increase in canvas size (see Figures 6 and 7). Now we need a layer for the frame. Click on the Add New Layer button (Figure 6, circled in green). Notice that the new layer is selected. Click to the right of the thumbnail on the original layer line and notice the color change.
Figure 6: Adjusting the layers Now click on the new layer. Most operations in the GIMP only work on the active layer, and this is the layer we want to create our frame on. But first, we need to move the new layer below the old layer. To do this, make sure the new layer is selected and click the down arrow, to the right of the Add New Layer button. When you are done, the dialog box should look like Figure 7.
Figure 7: After adding and moving the layers Now that the layer to hold the frame is present, we can fill it. This can be filled with a pattern, solid color, gradient, or even another picture. For now, let's use a solid color. While you can use any color you want, for this tutorial, we will use white. The figures below use gray simply because white doesn't show up too well against the white page of the magazine. Start by clicking on the two small black and white squares circled in red (see Figure 8) in the GIMP toolbox. This resets your foreground and background colors to black and white. The larger colored squares represent your current foreground and background colors (the leftmost one is foreground). Clicking on either of these, once selected (click a second time if the first click doesn't seem to do anything; it wasn't selected and the first click only selected it) brings up the change color dialog. The little, bent, two-headed arrow (circled in green) reverses the foreground and background colors.
Figure 8: The color selectors Now double click on the fill tool (the depressed button in Figure 8, looks like a paint can spilling paint in the GIMP 1.2 and 2.0). Be sure fill type is foreground color. Now click on the picture. Voila. You have your first simple frame (Figure 9).
Figure 9: Your first frame If the picture disappears, but the checkerboard pattern remains around the outside, it means you didn't select the new layer. Type Ctrl-Z and try again. Improving the frame You've got a frame, but it doesn't look very nice. So let's add a decorative stripe. With the frame layer still selected, select all. You can right click on the image and choose Select -> All, or use the menus (the GIMP 2.0), or use Ctrl-A. You should see little marching “ants”. Now go Select -> Shrink. Shrink the selection by 20 pixels. The marching ants will now be inside the picture rather than around it. Now we need to stroke the selection. This is where you transform the outline of your selection into a line drawing in one “stroke”. In both versions of the GIMP, the color of the stroke is whatever the foreground color is. For this tutorial, black was chosen. You can pick whatever color you think looks best. The stroke command can be accessed from Edit -> Stroke (but don't do it yet!). The stroke command has changed considerably from the GIMP 1.2 to 2.0. In 1.2, the stroke is done with whatever your current brush is. The brush can be set by clicking on the brush box. This is the white box with the fuzzy dot to the right of the color selectors in figure 8 (you may not have a fuzzy dot, but something will be there). Click on it and choose “Circle (05)”, then invoke the stroke command. It will be a small non-fuzzy circle. In the GIMP 2.0, selecting stroke from the menu will bring up a dialog box (Figure 10). Take the defaults except set the stroke width to 5 pixels.
Figure 10: The stroke tool in the GIMP 2.0 To get rid of the marching ants, use either Select -> None or Ctrl-Shft-A. Your picture should now look like Figure 11.
Figure 11: The enhanced frame Conclusion There are a number of additional changes and improvements you can make with your frame. Some frames are works of art in and of themselves. You're limited only by your imagination, and, hopefully, good taste. Remember that Ctrl-Z is undo. You will be using that a lot when trying to come up with the perfect frame for your picture. The methods described above are not the only way to make a frame. Frames can also be created with gradients, but that is a subject for another tutorial. Robert Spotswood, a HAL-PC member, is active in the Linux SIG and a freelance computer professional. He can be reached at robert@spotswood-computer.net. |
2008 2007 2006 2005 2004 Robert Spotswood, a HAL-PC member, is active in the Linux SIG and a freelance computer professional. He can be reached at robert@spotswood-computer.net |

