Window to the Web, by Beverly Rosenbaum
“To infinity ... and beyond!”
Buzz Lightyear, Space Ranger, declares in the film “Toy Story.”
There are only 3 simple steps between your decision to sign up with HALNet and enjoying a fast Internet connection.
- Step 1: Call HAL-PC.
If you’re thinking of getting high-speed Internet, you should check out HALNet’s broadband service first. Basically anyone who has SBC (Southwestern Bell) tone telephone service in the Houston LATA (Local Access and Transport Area) can order it. That would include area codes 281, 713, 832, and some numbers in 936, 409, and 979, covering the area from Navasota on the north to Galveston on the south, and Bay City on the west to Beaumont on the east.
When you call HAL-PC headquarters at 713-993-3300 (Monday through Friday between 10:00 a.m. and 7:00 p.m.) and ask for an ADSL specialist, James or Ron will check your telephone number and tell you immediately if your number is eligible.
If you choose to initiate service, the activation request will be made during that call. You’ll also be given the activation date, which is usually about a week later.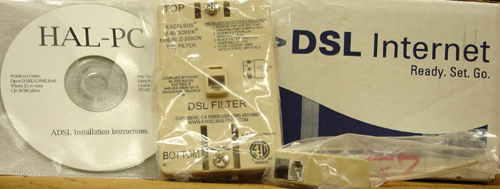
- Step 2: Plug in the hardware.
All you have to do next is plug in the DSL modem, power it on and wait for activation. When you sign up, you’ll receive a starter kit containing a leased modem, cables, filters for your phone line, and a CD containing complete instructions with good illustrations.
The same information is also posted on-line at www.hal-pc.org/networking/instructions/html/install.html. You can either pick up the starter kit at Headquarters (4543 Post Oak Place) or have it shipped to you for $12.95.
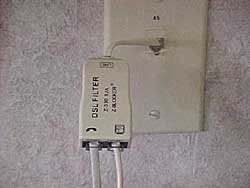
If possible, you should filter the line that will have the ADSL service at the point where it enters your house. Otherwise, you must install a filter for every single device inside the house or garage that’s connected to it, including fax machines and burglar alarm service. You’ll still be able to make calls or receive faxes on the same line that your computer is using.
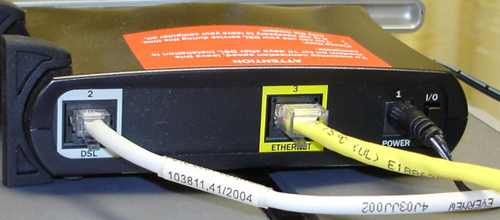
The cables included with your DSL modem are color-coded as shown in this photo, making it very easy to connect it correctly.
The gray DSL cable connects to the DSL port of the filter on the phone line, while the yellow Ethernet cable connects to the Ethernet card in your computer. There are no drivers to install, and it works for any operating system.
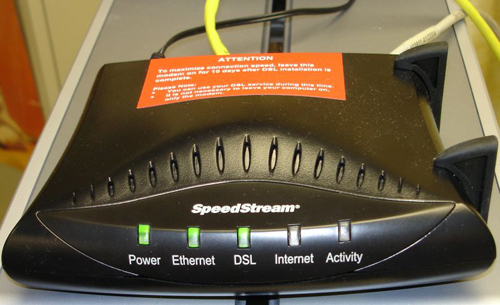
When you plug in the DSL modem for the first time, the lights will be green for Power and Ethernet and red for DSL prior to activation. Once the DSL light turns green, your service is ready to use.
- Step 3: Surf the ‘Net.
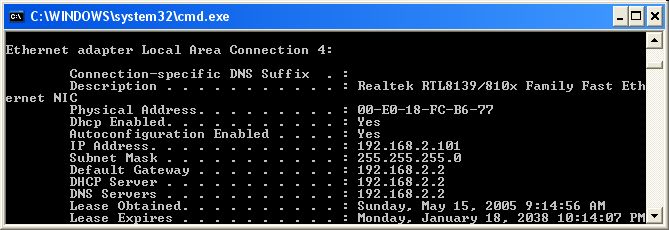
With your TCP/IP settings configured for DHCP (to obtain an IP address automatically) as shown below, you’re finished! The screens may look slightly different, but the instructions for TCP/IP settings are the same whether you’re using Windows, Mac OS, or FreeBSD.
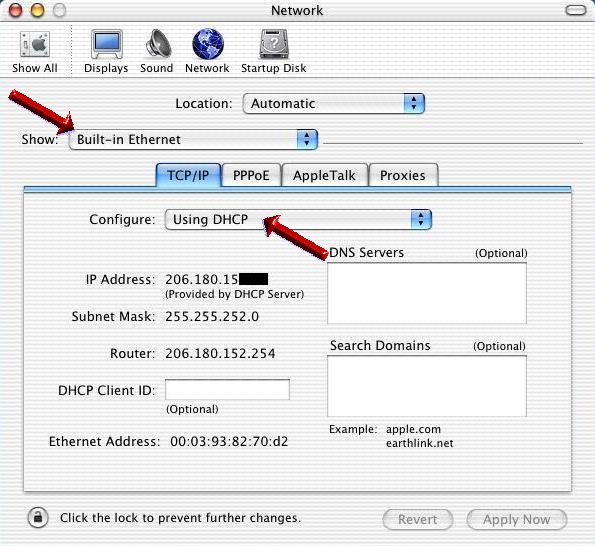
On a Mac, you’ll see the IP assignment in use when you view the network pane, and on a Windows-based PC, you can check to see what IP assignment you’re using by opening a command window and typing “ipconfig/all” (for Windows 2000 and XP).
If you have a successful connection, you should see an IP address of 206.180.15x.xxx when your computer is plugged directly into the DSL modem, or 192.168.x.x when going through a router. If this is not the case, then you’ll need to review the troubleshooting page included in the documentation, or call HALNet support.
There are a couple of other settings to be changed in your mail program and browser, but these are well-documented on the CD and also in the ADSL section of on-line help posted at www.hal-pc.org/support/. Following these steps, you’ll have a single computer working successfully with your broadband connection. That brings us to some very important points in the difference between HALNet’s ADSL service and what’s provided by SBC.
- The SBC service uses the PPPoE protocol, which makes their “always-on” ADSL internet connection act like a dial-up modem, where you have to make a connection each time you want to start using the Internet. HALNet uses DHCP instead of PPPoE, so your connection is truly “always on.”
- The required SBC-Yahoo software necessary for the PPoE connection generates other popup windows; HALNet’s standard DHCP connection does not require any software.
- SBC only allows you one IP Address per ADSL account, so you can only connect one computer - unless you set up a router and pay a higher fee. HALNet allows you three IP addresses at its promotional rates, so you can connect three computers without having to bother with a router. You do have the option to use a router to create a more advanced network, which will be discussed in a later column.
- SBC tech support is offshore. HALNet’s ADSL specialists are located on-site at HAL-PC Headquarters; they write and update the posted documentation and you can speak to them directly by phone or in person.
Questions or Concerns?
For the best experience with ADSL service for your computer, you should first make sure that you have current signatures for your antivirus software and updated security patches for your operating system. If you have any questions, concerns, or other information to share with me, please send them to the e-mail address listed below.
At this point, only one question remains for me: Why did I wait so long?
Beverly Rosenbaum, a HAL-PC member, is a 1999 and 2000 Houston Press Club “Excellence in Journalism” award winner. Send her your comments about this column to webwindow@hal-pc.org.
|