Tips and Tricks for Using Software Effectively
by Mel Babb
This column will cover features, some new some old, often overlooked by computer users, both new and long time users. We’re hoping you will incorporate at least one of the tips.
We’d love to hear from you about what you find helpful. If you have any suggestions about what you would like to see covered, please email Mel Babb at melbabb@earthlink.net. Please, include your phone number so she can call you about
it.
Isn’t It Time You Tried These Windows XP Settings?
Here are some settings you might want to do in Windows XP. Once you get used to the changes you may find you like them.
If you are just getting a new computer with Windows XP (either home or professional), be sure a firewall is turned on (see below for how to check whether the Windows firewall is on or off) and update windows, your virus program, Ad Aware and Spybot
Search and Destroy (if you use them). If you use something other than the Windows firewall, update it too. The machine may have come with Norton or McAfee or you may be using the free Zone Alarm. To start off clean and safe see the article How to
Bulletproof Your Computer from November/December 2005 Hal-PC Magazine .
Do Not Display Icons on your Desktop
To enjoy fully whatever picture you put on your desktop do NOT put icons on your desktop. Instead pin the programs you use often to your start menu, or turn on the desktop and/or quick launch toolbars on the taskbar. We’ll look at each of these.
First if you use the pin feature on the Start Menu, you do not have to minimize or close an open program to see the desktop so you can open another program. Simply click Start and then the program you want. You will notice the Start menu has two columns.
(If two columns do not show, right click Start, choose Properties. Then dot “Start menu”. ) The first column has the programs you use and the second column has icons for the other places you may want to access. Many of these second column
items resided on the desktop in other versions of Windows.
As you open programs, they appear in the bottom half of the first column of the start menu and rotate off as different ones are opened. To make a program stay at the top of the first column of the start menu, pin it to the menu.
Pin a program to the Start menu
Open a program the first time by clicking Start, All Programs and clicking the program you want.
Click on Start, The icon for the program appears on the start menu.
Right Click on the program and click “Pin to Start menu”
It moves to the top of the menu and stays there.
Hide Icons and Turn on the Desktop Toolbar on the Taskbar
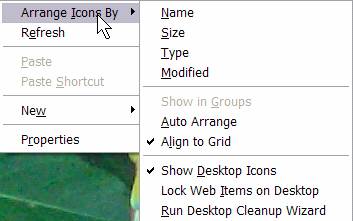
Right click on the Desktop, Choose Arrange Icons By, Show Desktop Icons
In 5-10 seconds the icons will disappear.
(To show them again, repeat the command.)
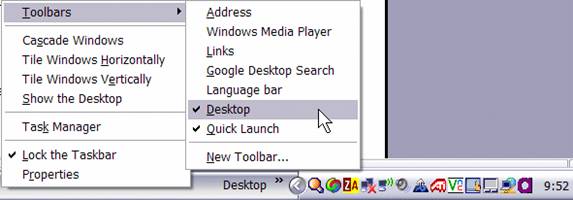
Then Right click in a blank area of the Taskbar (the bar at the bottom of the screen)
Choose Toolbars, Desktop
“Desktop” appears on the right side of the toolbar before the navigation tray (previously called task tray).
Click on the arrow to the right of the Desktop icon to see the list of all your desktop icons.
To Turn on the Quick Launch bar
The Quick Launch bar, now in Windows XP, replaces the Microsoft Office shortcut bar. You can put shortcuts on the bar for programs and files you want to open conveniently. A shortcut is like a remote control button. It opens the program or file without
you having to go find it in the My Computer or My documents file dialog box.
The safest way to put a program shortcut on the Quick Launch bar
Click Start, All Programs, and right click the program you want to add.
Choose Create Shortcut. A duplicate of the item appears at the end of the programs list.
Drag the item to the Quick Launch bar and release it when the black I beam is where you want the icon. (If you simply drag the original icon from the menu, it will move it to the bar and remove it from the menu!!)
To add a shortcut for a file to the Quick Launch bar
Open My Documents, right click on the file and drag it to the bar.
Release it when the black I beam is where you want the icon.
Choose “Create shortcuts Here”.
Adjust the size of Quick Launch bar and Lock it
So you have room to display the open programs on the Taskbar, you can drag the right side of the Quick Launch bar toward the left. An arrow will appear for you to click to show the unseen icons. Then you can lock the toolbar so you do not inadvertently
move items around on it. Right click a blank area of the taskbar, Click “Lock the Taskbar”.

To Put a Picture of Your Choice on the Desktop
Open My Documents and find the picture you want to use
Click on the picture. In the left Task Pane, a Picture Tasks section displays.
Choose Set as Desktop Background
Press the Flag key +D to display the desktop +D to display the desktop
Right click the Desktop, choose Properties
Click the Themes tab
Click Save As. Type a name for the picture. Click Save
Click OK
This way you’ll be able to reuse the picture again easily by just picking it from here.
Change These Defaults in Windows XP

Every file has “instructions” coded in it indicating what it is for and the program needed to use it. Shown in any file dialog box, like My Documents, is the category of the file (Microsoft Word Document) and a distinct icon for each type.
In addition each file has a 2-4 character extension for the category (.doc) which is not displayed in the default view. Since extensions have been around since the DOS days, computer folks can confuse you by saying things like “open any doc file” rather
than “open any Word file”, so it is helpful to see the extensions in the dialog box. Yes, lots of duplication exists, the icon, the type, the extension all represent the same thing in the file.
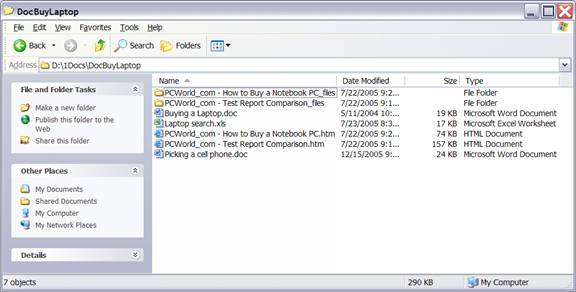
If you create lots of files, not all of them show in the file dialog box window unless you scroll and it can get hard to find what you want. So you can change the view to “details” view which lists each file on a line displaying the Icon,
Name, Size Type and Date Modified of it. Best of all about this view is that you can quickly sort the list by simply clicking on the heading. For instance, click Date Modified and it sorts in date ascending order. The up arrow next to date modified
indicates ascending. Click again and it sorts descending order. Note that it sorts all folders first and then files under the folders. Folders are categories created by you (or the people who wrote the programs) for organizing files. Sorting by date
can help you find a file when you can remember about when you created it, but can’t remember what you named it. That’s one of my frequent memory lapses. Another thing you can do in this view is change the order of the columns. All you have
to do to reposition a column is click on the heading and drag it to the new location.
To Change View Options in My Documents and Other File Dialog Boxes
Click Start, My Computer
Click the View icon and choose Details
On the menu, Click Tools, Folder Options
Click View tab
Check “Apply to all folders” button at the top
This makes this view display in all file boxes you open
Check “Display the full path in the Address Bar” and
Check “Display full path in the Title Bar” Then
Uncheck “Hide Extensions for Known file types
Click OK (this will apply all changes and exit the box)
Here’s a few other changes you can easily make.
Put Volume icon on taskbar
Click Start, Ctrl Panel, Sounds & Audio. Check “Place volume icon on the taskbar”
In My Computer
This will stop the pesky box that shows up every time something in Microsoft goes wrong.
Click Start, Right Click My Computer, Properties
Click Advanced tab, Click Error Reporting at bottom, Select “Disable error reporting”, Check “But notify me when critical errors occur”
Click Remote tab, Uncheck Remote Assistance and Remote Desktop. Click OK.
Enlarge the icons on the Windows
As resolution gets bigger, the icons and print on the screen gets smaller. Do this to make things bigger.
Right click Desktop, choose Properties
Click Appearance tab
Under Font Size, choose, large or extra large, OK.
Click Start, Control Panel, Network connections
If you are networking computers together, this can help.
Right Click the connection, Click Properties. Check at bottom of box "Show icon in notification when connected”.
Hope you try one of these tips. Till next time, happy computing.
Mel Babb © 2006
Mel Babb, a long time member of Hal-PC, is currently an instructor and on the volunteer help committee at Hal-PC. She runs her own company, PC Tutoring Services. She comes to your home and creates notes for you on what you want to learn.
|